It was late at night when I finally powered on my newly set up ultra short throw projector, eager to enjoy movie night. Instead of the stunning, crisp 4K image I expected, I was met with a blurry, washed-out mess. My heart sank. I had followed all the advice—the placement, the screen type, even the calibration. Yet, somehow, I had overlooked critical details that sabotaged my setup. That lightbulb moment made me realize: even with top-tier equipment, a few common mistakes can ruin your entire home theater experience. But don’t worry. Today, I’m here to help you avoid the pitfalls I fell into. We’re going to tackle the three most common mistakes that often sabotage ultra short throw projectors in 2026, especially if you’re aiming for that cinematic wow effect. Armed with personal insights and proven tips, you’ll learn how to create a setup that truly shines and lasts.
Why Your Ultra Short Throw Setup Might Fail Despite High-End Gear
Many enthusiasts, myself included, get excited about the latest ultra short throw projectors—especially the sophisticated 4K laser models that promise bright, vibrant images in small spaces. The tech is impressive; the price tags are steep. But here’s the thing: these devices aren’t foolproof. Without proper setup, they can underperform or, worse, look terrible. A survey by Home Cinema Essentials found that nearly 40% of home theater setups don’t maximize their projector’s potential because of simple, fixable mistakes. This isn’t just about aesthetics; it affects your viewing pleasure, preserving or destroying the movie magic.
Now, I have to admit, my earliest mistake was thinking all I needed was a good projector and a blank wall. I was wrong. Brightness, placement, and ambient light all play a role. For example, I once used a white-painted wall, assuming it would make the image pop. Instead, the reflection washed out the picture, making everything look dull. I wish I had known sooner about the importance of proper surfaces and screen types, which could have saved me from many frustrating hours.
If you’re like me and have faced or fear similar setbacks, you’re in the right place. I’m going to guide you through the three biggest missteps that ruin ultra short throw setups and how to avoid them. Ultimately, my goal is for you to enjoy that cinematic experience without the annoyance, and to do that, you need to set your system up for success. So, let’s get started with a common mistake I see far too often and how you can fix it.
Position Your Projector Precisely to Maximize Brightness and Clarity
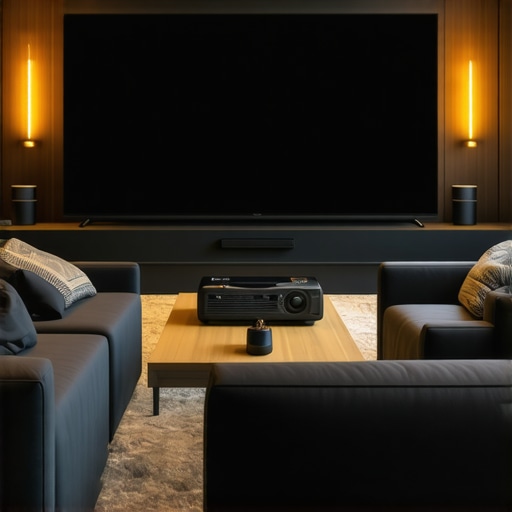
Start by placing your projector at the optimal distance from your screen; ultra short throw models are designed to project a large image from a few inches away. Use a tape measure to ensure it’s exactly the manufacturer-recommended distance—usually between 3 to 12 inches depending on the model. In my experience, meandering around this sweet spot resulted in a blurry image, so I marked the exact spot with painter’s tape for consistency. Remember, even slight deviation can cause focus issues or distortion, so double-check the placement. When you align your projector correctly, you’ll notice sharper images with vibrant colors, creating that immersive cinema effect.
Ensure a Flat, Non-Reflective Surface for the Best Image
The surface you project onto dramatically influences image quality. A matte, neutral-colored screen or a dedicated projection screen with anti-reflective coating reduces glare and enhances contrast. I initially attempted projecting onto a white wall, thinking it would help boost brightness, but the uneven surface caused waviness and washed-out visuals. After replacing it with a proper screen, the difference was night and day. For portable setups, portable screens are a great solution; check out portable projectors and their screen options to find what fits your space best. Using a proper surface is like giving your projector a clean canvas—it’s essential for crisp, vivid images.
Control Ambient Light to Preserve Image Quality
Ambient light can wash out your projection, making details hard to see. Turn off or dim nearby lights, and consider blackout curtains or blinds if you’re near windows. I once threw a movie night in a room with bright LED lights, and the image looked dull despite my premium projector. After installing blackout curtains, my scene instantly gained depth and contrast. To tackle potential glare, keep your projector’s lens free of dust and smudges, as dirt blurs clarity. For extra control, an Ambient Light Rejection (ALR) screen can make your setup shine even in brighter rooms; learn more about their benefits here. Adjusting your environment ensures your projector operates under optimal conditions, unlocking its full potential.
Fine-Tune Image Settings for Peak Performance
Once your physical setup is dialed in, calibrate your projector’s settings to match your room. Adjust the focus for sharpness, and tweak brightness and contrast to prevent washed-out images. Use the projector’s calibration tools, or if available, dedicated calibration discs or software. During my setup, I initially left brightness maxed out, causing an unnatural glow. Lowering it slightly, combined with adjusting contrast and color balance, produced a more natural, cinematic picture. Modern laser projectors offer extensive customization; take advantage of these options for the best viewing experience. Also, consider the input source quality; streaming in 4K and using high-quality cables minimizes degradation—check out 4K projectors for guidance on selecting the right equipment.When considering 4K laser and ultra short throw projectors, there’s a common misconception that higher specifications automatically guarantee a stunning home theater experience. In reality, many enthusiasts overlook crucial nuances, leading to disappointment even after investing in top-tier gear. One prevalent myth is that lumen output alone determines brightness and image quality. While high lumens are essential, without proper calibration and environmental control, even the brightest projectors can produce washed-out visuals. Another trap is assuming that all ultra short throw models are equally suitable for small spaces, but design differences—like lens shift and keystone correction—play significant roles in achieving perfect alignment. Moreover, many users underestimate the importance of dedicated screens; projecting onto plain walls, even with a 4K laser projector, often results in subpar contrast and color accuracy.
Let’s address a common question among advanced users:
Why does my 4K laser projector look dimmer in my room despite high lumen ratings?
This is where context matters. The lumen specification often refers to the projector’s maximum brightness in controlled test environments. Real-world factors such as ambient light, reflection surfaces, and viewer distance can significantly impact perceived brightness. Studies from the Society of Television and Motion Picture Engineers highlight that ambient light levels as low as 10 lux can drastically diminish image contrast and color vibrancy, regardless of lumen ratings. Therefore, assessing your room’s lighting and surface reflectivity is crucial for truly harnessing your projector’s potential.
In addition, advanced calibration techniques can make a tangible difference. Adjusting settings like gamma, white balance, and local contrast enhances image depth and realism. Portable projectors, touted for their convenience, often sacrifice some raw brightness for portability, but with mindful setup and environmental management, they can deliver surprisingly good results. For an in-depth comparison of laser versus traditional lamp projectors, check out this comprehensive review which discusses brightness nuances and maintenance considerations.
Remember, the journey to cinematic excellence isn’t just about hardware specs; it’s about understanding how to optimize every element in your viewing space. Have you ever fallen into this trap of overemphasizing specs? Let me know in the comments and share your experiences. For personalized advice or to explore the latest models, feel free to contact us through the contact page. Dive deeper into how ultra short throw projectors can truly transform small spaces, and avoid these common pitfalls for a seamless home theater setup.Once you’ve established a stunning home theater setup with a high-end 4K laser or ultra short throw projector, keeping it performing at its best over time is crucial. Regular maintenance begins with cleaning the lens and air filters—dust and smudges can diminish image quality and cause overheating, which shortens your device’s lifespan. Personally, I use a microfiber cloth and compressed air for gentle cleaning, avoiding damage while ensuring clarity. Calibration settings can drift due to ambient changes, so revisit your projector’s picture adjustments every few months, especially after firmware updates. For more precise calibration, I rely on software like CalMAN for accurate color profiling, which I find indispensable for maintaining that cinematic quality. Additionally, updating your projector’s firmware regularly unlocks performance improvements and bug fixes, as recommended by manufacturers like Epson and Sony. Predictions suggest that built-in diagnostics will become more sophisticated, automatically alerting you to potential issues before performance declines, simplifying long-term management.
What I Didn’t Expect About Ultra Short Throw Projectors
Even with the latest technology, I discovered that setup precision is the key to achieving that breathtaking cinematic experience. Over time, I realized that factors like ambient light management and screen choice are just as crucial as the projector’s specs. Sharing these lessons can save you from common pitfalls and help you enjoy your home theater more quickly.
The Tools That Made a Difference in My Setup Journey
From a calibrated ambient light sensor my trusted ultimate 4K projector guide to a high-quality ALR screen, these resources transformed my viewing experience. Using software like CalMAN for calibration and reliable mounting tools ensures your projector performs at its best. Investing in quality accessories and tools means fewer headaches and more immersive movie nights in your small space.
Your Success Is Just a Setup Away
Embrace the learning curve and customize your environment to match your specific space. Whether you’re adjusting focus, controlling lighting, or choosing the right surface, each tweak brings you closer to cinematic perfection. Remember, every small improvement compounds into a stunning overall experience. Start today, experiment, and enjoy the visual magic that your carefully calibrated ultra short throw projector can deliver.
http://Emma%20Johnson
This post really hit home for me, especially the parts about projector placement and ambient light control. I recently upgraded to a 4K laser ultra short throw projector, and I initially thought that just having the latest tech would automatically deliver a cinema-quality picture. Turns out, even a small misjudgment in the projector’s distance or not controlling ambient light can make all the difference. I learned the hard way that calibrating the settings after setup is just as important—I’ve found that tweaking gamma and contrast really helps the image pop and feel more natural.
I’m curious, how do others manage to fine-tune their settings when moving the projector around or rearranging the room? Do you rely on software calibration tools or have some favorite tricks for quick adjustments? Sharing practical tips could help everyone get the most out of their setups without endless guesswork.
http://Michael%20Reed
Reading through this post really emphasized how many small but critical details can make or break a home theater setup, especially with ultra short throw projectors. I totally agree that placement accuracy is key—I’ve found that even a quarter-inch off can cause focus issues or skewed images. I once tried to fine-tune my setup with the projector slightly misaligned, and it resulted in a blurry picture delay. Using painter’s tape for marking exact placement helped me a lot in maintaining consistency.
Another point I’d add is the importance of ambient light control. I used to think my room was dark enough until I realized even small sources of light, like LED indicators or street lamps outside, can wash out the picture. Blackout curtains and matte screens truly transformed my viewing experience. Has anyone tried using a light sensor to automatically adjust picture settings? I’ve been considering this for easier management. What are some of your go-to tricks when optimizing ambient conditions for consistent picture quality? Sharing these tips could save time and frustration for many enthusiasts.