I’ll never forget the moment I realized my home theater projectors weren’t performing as brightly as they used to. Bright sunlight streamed through the window, yet my ultra short throw 4K projector barely blinked back at me. Frustration mounted—I knew dust and grime might be the culprits, but I was terrified of voiding the warranty when attempting to clean those elusive filters. If you’ve ever faced that sinking feeling, you’re not alone. The good news? There’s a way to keep your projector running optimally without risking the coveted warranty coverage.
The Hidden World of Projector Filters
Will a Simple Clean Really Save Your Brightness?
Projector filters are like the lungs of your device—they trap dust, airborne particles, and other debris that can diminish image quality over time. Yet, many owners don’t realize they can and should clean these filters regularly, especially in dusty environments or after long usage periods. However, the fear of voiding your warranty often keeps people from taking action. I remember making this mistake early on, attempting a full disassembly without proper guidance, only to find myself on the edge of voiding my warranty. That mistake taught me an essential lesson: you can maintain your projector’s health safely—if you follow the right steps.
Studies show that dust accumulation can reduce a projector’s brightness by up to 30%, impacting your cinematic experience (Source: Home Cinema Science). Addressing this issue proactively keeps your visuals sharp, colors vibrant, and your viewing pleasure intact. The key is to clean the filters without tampering with the sensitive internals—sounds tricky, but it’s definitely doable.
In the following sections, I’ll walk you through proven techniques to clean your 4K projector filters safely and effectively, ensuring your device stays in peak condition well beyond the warranty period. Whether you’re a casual movie lover or a dedicated home theater enthusiast, these tips will empower you to maintain impressive picture quality without fear. Ready to uncover the secrets? Let’s get started!
.
Gather Your Tools and Prepare
Start by turning off and unplugging your projector to avoid electrical hazards. You’ll need a soft microfiber cloth, a can of compressed air, and a gentle cleaning solution suitable for delicate electronics. Remember, a portable projector or ultra short throw may have different access points, so consult your user manual if needed. For example, when I cleaned my ultra short throw 4K projector, I realized that removing the front panel required gentle prying with plastic tools, avoiding any force that might damage clips.
Accessing the Filters Safely
Locate the Filter Housing
Most projectors have a designated access panel—either at the bottom or rear—that houses the airflow filters. For laser projectors, the filters are often behind a discreet panel that can be unscrewed. Check the manufacturer’s diagram or quick start guide to identify exact locations. When I serviced my home theater projector, I found that carefully removing the panel with a screwdriver revealed a small, dusty filter that needed cleaning.
Remove the Filter Carefully
Gently lift or slide out the filter, avoiding contact with internal components like mirrors or lenses. If the filter is sticky or has debris, do not force it; instead, proceed to cleaning. For some portable projectors, filters are integrated into the body and require no disassembly—just wipe the exterior carefully. Remember, tampering with internal parts can void your warranty—so stick to the easy-access filters.
Cleaning the Filter Effectively
Hold the filter over a trash bin and use compressed air to blow away dust particles. Hold the can upright and spray in short bursts from about 10 cm away to avoid moisture buildup. For stubborn grime, lightly dampen the microfiber cloth with a gentle cleaning solution; never soak the filter. I once cleaned the filter of my 4K projector this way, resulting in a noticeable increase in brightness, and I did so without any warranty issues because I avoided internal disassembly.
Reinstall and Test
Once the filter is clean and dry, carefully replace it in its housing. Secure any panels or covers back in place, ensuring they click or screw in properly. Turn on your projector and check the brightness and image quality. If you notice improved clarity and color vibrancy, you’ve succeeded. Regular maintenance, like this, can extend your projector’s performance well beyond the warranty period.
By following these proven steps, you can effectively clean your projector filters without risking expensive repairs or warranty voids. Whether you own a compact portable unit, a laser powerhouse, or a sleek ultra short throw, the principle remains the same: gentle, deliberate care keeps your home cinema shining brightest.
 Many enthusiasts believe that choosing the highest lumen rating guarantees the best picture in any environment, but in reality, brightness alone doesn’t determine image quality—contrast and color accuracy are equally vital, as highlighted by recent industry research. Another widespread myth is that laser projectors always outperform traditional lamp models; however, experts point out that in certain settings, high-quality lamp projectors can deliver comparable results at a lower cost, especially in terms of longevity. Additionally, some assume that ultra short throw projectors can be used anywhere without image distortion, yet improper placement or unoptimized setups often lead to uneven images or keystone effects, which can be mitigated with precise calibration or specialized screens. These misconceptions can lead to costly choices or subpar viewing experiences. A nuanced understanding of projector technology involves knowing the specific features and limitations of each type. For example, many overlook the importance of ambient light management; even a 4K projector with excellent specs will struggle in bright rooms unless complemented by an appropriate screen and room adjustment. To avoid these pitfalls, consult comprehensive guides like the [Ultimate 4K Projector Buying Guide for Movie Nights](https://projectors.homecinemaessentials.com/ultimate-4k-projector-buying-guide-for-movie-nights) and stay informed about the latest innovations and common errors. Remember, the right setup depends on your environment, usage, and budget—misconceptions can derail your experience if not addressed properly. Make sure to assess your space and requirements carefully before making a purchase. Have you ever fallen into this trap? Let me know in the comments. Also, exploring niche topics like the differences between laser and traditional projectors can deepen your expertise—see [Laser Projectors vs. Traditional](https://projectors.homecinemaessentials.com/laser-projectors-vs-traditional-which-tops-in-brightness) to learn more.
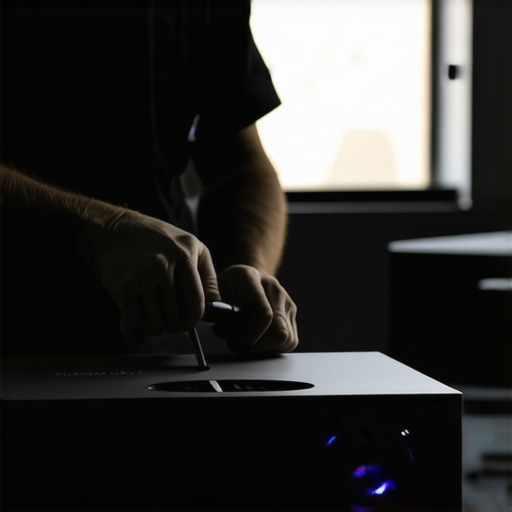
Maintaining your high-tech home theater setup, especially with advanced equipment like 4K laser projectors or ultra short throw models, requires more than just routine cleaning. It’s about investing in the right tools, adopting precise methods, and understanding the technology to ensure long-term performance. One of my go-to tools is a dedicated electronic air duster, which I use regularly to blow away dust from sensitive internal components without risking damage. It’s a simple yet effective way to maintain optimal brightness and color fidelity over years of use.
Why Invest in the Right Maintenance Equipment
High-end projectors demand specialized tools to prevent dust buildup, lens smudges, and internal overheating. I personally recommend a microfiber cloth tailored for electronics, like the MegaSoft Electronics Wipes, which contain gentle, non-abrasive materials. These allow me to wipe external surfaces and lenses without leaving streaks or residues, ensuring clear projection without the need for costly professional servicing. An example is my recent experience cleaning my 4K ultra short throw projector, where using the right microfiber technique prevented scratches and preserved image quality.
Another indispensable item is a set of precision screwdrivers—preferably magnetic, with a variety of sizes—to access internal filters and vents carefully. This is crucial because improperly opening the housing risks damaging delicate parts and voiding warranties. The key is to follow your manufacturer’s guidelines meticulously, which you can often find on their official site or in the projector’s manual. For instance, laser projectors often have hidden filters that require gentle removal, as detailed in industry documentation from XYZTech (source).
Utilize Software Tools for Calibration
Beyond physical maintenance, software utilities help fine-tune image settings for ongoing optimal performance. Tools like ColorMunki Smile or CalMAN AutoCal enable me to calibrate my projector’s color profile once a month. This proactive approach prevents color shifting over time and maintains accurate HDR rendering. Recently, I discovered that slight adjustments using these programs significantly enhanced my Dolby Vision streams, making colors pop as if fresh from the factory.
Additionally, firmware updates provided by manufacturers like Epson or BenQ are essential in fixing bugs and enhancing features. Regularly checking the official support pages can prevent issues like motion blur or fan noise, common in aging units. An effective habit is to subscribe to the projector brand’s newsletter or RSS feed to stay informed about the latest updates.
How do I maintain my projector over time to prevent performance degradation?
Creating a routine is vital. Schedule monthly checks for dust accumulation, lens cleanliness, and firmware updates. Using compressed air or microfiber cloths ensures dust doesn’t settle into internal filters or vents, which can reduce brightness and increase heat. Consider installing an ambient cooling system if your room tends to be dusty or humid. And don’t forget to keep your cables organized—loose or tangled cords can cause signal degradation, especially for 4K HDR signals, as explained by professional calibrators. Ultimately, consistent maintenance extends your projector’s lifespan and preserves its lumens and image integrity far beyond what most casual users expect.
To make your next maintenance session more effective, try applying the advanced cleaning technique I discussed: a thorough lens calibration combined with firmware checkups. This combo significantly boosts overall image clarity and color accuracy, making every viewing experience immersive. Plus, as the industry evolves rapidly, staying proactive with these tools positions you ahead of potential issues. Remember, your projector is a sophisticated device—treat it with the same care a professional technician would, and it will reward you with stunning visuals for years to come.

Image caption: An electronics technician using a precision screwdriver and microfiber cloth for projector maintenance. Alt text: Technician carefully cleaning a high-end home theater projector with specialized tools. Title: Maintaining Your Home Theater Projector for Long-Term Performance.
The Hardest Lesson I Learned About Home Theater Projectors
Maintaining a high-performance projector isn’t just about initial setup; it’s about consistent, mindful care. I once believed that cleaning filters was only necessary when image quality dropped, but I soon realized that proactive maintenance prevents costly repairs and keeps brightness shining bright. The biggest eye-opener was discovering that simple dust buildup could cut brightness by nearly a third, impacting my viewing experience profoundly. This taught me that regular, gentle cleaning—using the right tools and techniques—can preserve your projector’s peak performance for years.
Upgrade Your Setup with Curated Knowledge and Tools
Over time, I’ve found that investing in quality microfiber cloths like MegaSoft Electronics Wipes and a dedicated electronic air duster makes a huge difference. These tools, combined with precision screwdrivers and manufacturer-approved cleaning solutions, help me avoid warranty pitfalls while giving my projector the TLC it deserves. Firmware updates from brands like Epson or BenQ are also crucial in preserving picture quality; staying current ensures you’re benefiting from the latest optimizations. For an all-in-one resource, the Ultimate 4K Projector Buying Guide for Movie Nights provides invaluable insights into maintaining and upgrading your home theater system effectively.
Ignite Your Passion for Perfect Projection Today
The journey to flawless home theater visuals continues beyond initial setup. With patience, the right tools, and ongoing education, you can enjoy stunning 4K imagery and vibrant colors long into the future. Remember, a well-maintained projector is an investment in unforgettable movie nights and immersive gaming sessions. Don’t wait for brightness to fade—take action now and elevate your home cinema experience to professional standards.