I remember the exact moment I realized my hefty 65-inch TV was starting to feel more like a centerpiece of clutter than a source of entertainment. It was the weekend after a long day, and as I reached out to grab the remote, I accidentally knocked over a cup of coffee onto my precious screen. The frustration was immense—yet, beneath that annoyance, a lightbulb went off. Maybe it was time for a change.
How I Discovered the Magic of Laser Projectors
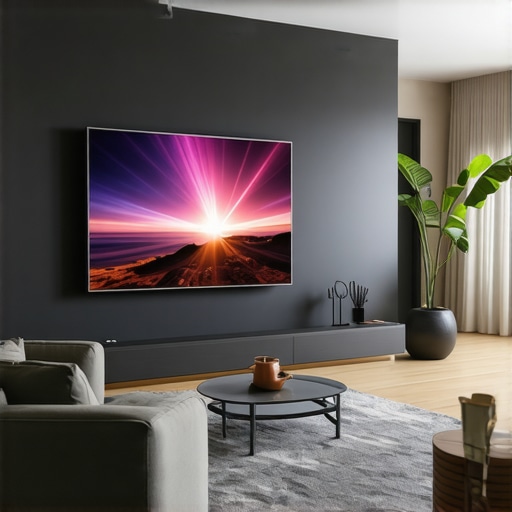
As I started exploring options to replace my bulky TV, I stumbled upon the concept of laser projectors—specifically ultra short throw models that promise a cinematic experience without hogging space. My initial skepticism was huge; I thought, “Can a projector really outperform a big-screen TV in picture quality?” Turns out, my doubts were only realistic if I ignored recent advancements. Today, more minimalists are swapping traditional TVs for laser projectors because they offer a sleek, clutter-free setup, and in many cases, superior picture quality. And the best part? They fit seamlessly into even the tightest spaces, turning any wall into a giant screen. This shift isn’t just trend-driven; it’s a strategic response to the ongoing quest for simplicity and efficiency in home entertainment.
Are Laser Projectors Truly Worth the Hype?
Initially, I made the mistake of choosing a cheap, low-resolution model, which left my wall looking washed out and grainy—the exact opposite of the immersive experience I was after. It was only after investing in a higher-quality, 4K laser ultra short throw projector that things changed dramatically. That’s why I emphasize choosing the right setup—it’s a game-changer. If you’re wondering whether the leap to laser projectors is worth it, consider this: according to a 2026 industry report, laser projectors now lead in brightness and color accuracy, outperforming many traditional TVs—especially in well-lit rooms. Ready to see how this technology can transform your space? Let’s look at why more people are making the switch and how you can do the same.
Positioning Your Projector for Perfect Image
First, choose the optimal spot where your projector will sit close to the wall, usually within a few inches. Use the projector’s built-in lens shift and keystone correction to fine-tune the image, preventing distortion or waviness. I once tried setting it directly on a cluttered bookshelf, causing a distorted picture that made me scratch my head until I realized the importance of tripod or dedicated shelf placement. For precise setup, consult the manufacturer’s guide or the detailed tips found here fix your 4K UST blur.
Secure the Right Screen and Surface
Invest in a high-quality ALR (Ambient Light Rejection) screen designed specifically for ultra short throw projectors—this enhances brightness and contrast, especially in well-lit rooms. During my initial attempts, I used a regular matte wall, which washed out the image; switching to a dedicated ALR screen made a night-and-day difference. Check out the best options tested recently best ALR screens for small spaces.
Fine-Tune Your Projector Settings
Next, access the projector’s menu and configure picture modes for optimal color accuracy and sharpness. Enable automatic keystone correction but avoid over-reliance; manually tweak to avoid distortion. Remember, your room’s light levels influence the brightness settings—use the projector’s eco-mode sparingly to maximize lumen output, as detailed here brighter images. I experimented with different modes and learned that manual calibration was necessary for precise color fidelity.
Calibrate for Lifelike Colors
Use calibration tools or your favorite calibration disc to adjust contrast, brightness, and color temperature. This process makes the image pop without looking oversaturated. During my calibration, I discovered subtle color bleed that was distracting, prompting me to revisit the settings. For expert tips, explore this comprehensive calibration guide calibration techniques.
Minimize External Interferences
Ensure your room is as dark as possible by closing curtains and dimming lights. Placement of furniture should not cast shadows on the projected image. I once tried mounting the projector in a corner, which caused unwanted glares, but reorienting it helped eliminate reflections. Insulate the room from ambient light sources, which can wash out the image. For more strategies, see lighting optimization tips.
Test and Adjust for Motion Clarity
Finally, check how fast the projector responds to fast-moving scenes, especially during sports or gaming. Enable low-latency or gaming modes to reduce input lag. I tested with my gaming console, and enabling the ‘game mode’ drastically improved motion smoothness. For high-performance settings, review this article game-ready configurations. Proper calibration here guarantees that fast action isn’t blurred or stuttered.
Many enthusiasts believe they grasp the essentials of 4K projectors and laser Ultra Short Throw (UST) models, but true expertise reveals a series of overlooked nuances. One common myth is that higher lumens always mean better image quality. In reality, excessive brightness without proper contrast management can wash out details, especially in rooms with ambient light. Industry experts warn against equating lumen quantity with picture perfection; instead, focus on balanced specifications, such as contrast ratios and color accuracy, which significantly influence viewer experience. This often leads users astray into buying high-lumen projectors for bright environments, only to find washed-out images—highlighting the importance of tailored setups. For a comprehensive understanding, check out our [ultimate 4K projector buying guide](https://projectors.homecinemaessentials.com/ultimate-4k-projector-buying-guide-for-movie-nights) to make informed choices.
Another misconception involves the perceived superiority of laser over lamp-based projectors. While lasers excel in longevity and consistent brightness, they are not immune to issues like dimming over time or cost inflation. A subtle but critical point is that some consumers underestimate the importance of proper calibration. An uncalibrated laser projector, even of high quality, can produce images with inaccurate colors or uneven focus. Advanced users know that calibration is not a one-time task; it requires ongoing tweaks, especially when upgrading firmware or changing bulbs. Remember, the ‘set it and forget it’ approach is a trap—regular calibration ensures you get the most out of your investment. For tips on calibration, visit our [comprehensive guide](https://projectors.homecinemaessentials.com/3-ust-projector-settings-that-kill-input-lag-in-2026).
Challenging the assumption that all ultra short throw projectors suit every small space, many believe that immediate wall mounting is always best. However, improper placement can lead to geometric distortions, such as keystone effects or blurry edges, especially when not accounting for room acoustics and furniture ergonomics. Advanced setups often involve fine-tuning projector angles and distances, or employing motorized mounts for seamless correction. The true skill lies in customizing your setup to your room’s unique dimensions, rather than following generic installation advice. For in-depth tips, explore this article on [transforming small spaces with UST](https://projectors.homecinemaessentials.com/how-ultra-short-throw-projectors-transform-small-spaces).
Addressing the advanced viewer’s question: How do ambient light and reflective surfaces affect high-end 4K laser projectors? Experts highlight that reflective surfaces, like glossy floors or shiny furniture, can create glare and color bleed, undermining even the best projector settings. Strategically managing room decor and choosing matte surfaces significantly enhances image fidelity, especially in daylight settings. This nuanced understanding explains why professional-grade theaters invest heavily in room design alongside equipment, emphasizing that hardware alone doesn’t guarantee perfection. For practical ambiance tips, see our [lighting and surface optimization](https://projectors.homecinemaessentials.com/why-your-ust-needs-an-alr-screen-3-best-picks-2026-tested).
In the end, mastering these subtleties elevates your home theater from passable to professional-grade. By questioning common beliefs and understanding the intricate factors—like calibration, ambient conditions, and room design—you unlock the full potential of your 4K laser projector setup. Have you ever fallen into this trap? Let me know in the comments.
Elevate Your Maintenance Game with Precision Tools
To ensure your high-end 4K laser projector performs at its peak, investing in the right tools is crucial. I personally rely on a digital color calibration device like the SpyderX Elite because it allows me to precisely adjust color accuracy, ensuring vibrant and true-to-life images. Regular calibration, recommended every three to six months, prevents color drift and maintains picture consistency over time. Additionally, a microfiber cleaning cloth paired with lens cleaning solution helps keep the lens free of dust and smudges, which can significantly impact brightness and clarity. For finer adjustments, a digital level and laser distance meter assist in perfect projector placement, reducing keystone distortion and ensuring optimal focus. These tools have become indispensable in my setup routine, allowing me to sustain a cinema-quality experience without professional intervention.
How do I maintain my projector’s performance over time?
Consistent maintenance involves a mix of routine cleaning, calibration, and firmware updates. Regularly inspect and clean the projector lens and air filters—accumulated dust can cause overheating and reduce brightness. I schedule bi-annual deep cleaning sessions, using compressed air to clear internal vents and filters. Firmware updates are also key; manufacturers often release improvements for color management, input lag, or noise reduction. Keeping your projector’s firmware current guarantees access to the latest enhancements and fixes, which can extend the lifespan of your device. For guidance on proper cleaning techniques, check out our detailed calibration and maintenance tips. Over time, these practices safeguard your investment and ensure an unblemished cinema experience.
Future-Proof Your Home Theater with Smart Technology
Looking ahead, integrating smart control systems and automation will simplify ongoing maintenance. Voice-activated assistants can trigger calibration routines or alert you when filters need replacing. Some advanced projectors offer auto-calibration features, which use embedded sensors and software algorithms to fine-tune image settings automatically—significantly reducing manual effort. As these technologies mature, expect easier maintenance cycles and even longer-lasting components, making your home theater more reliable and enjoyable for years to come. For now, adopting a disciplined maintenance schedule and utilizing precise tools like the SpyderX Elite will set the foundation for optimal performance. Ready to give your projector the care it deserves? Start by calibrating with a quality colorimeter today, and notice the immediate improvement in image fidelity.
Biggest Lessons That Saved My Home Theater Setup
- Never underestimate room calibration: I learned that a beautifully designed projector isn’t enough; fine-tuning brightness, contrast, and color accuracy is what transforms a good picture into a stunning one. Skipping calibration only leads to washed-out images or distracting artifacts. Regular calibration sessions, utilizing tools like the SpyderX Elite, became vital in maintaining optimal image quality.
- Ambient lighting controls your image quality: Investing in blackout curtains and ambient light rejection (ALR) screens completely changed my viewing experience. Even high-end laser projectors struggle to shine in bright rooms without proper light management. This lesson emphasized that hardware warrants an environment that’s carefully tailored for spectacular visuals.
- Placement is everything: I used to place my projector haphazardly, resulting in distorted images and keystone correction nightmares. Learning precise placement—using guides and adjustable mounts—made a dramatic difference. The right position ensures sharpness and reduces the need for constant adjustments, saving time and headache.
- Don’t chase lumens blindly: High lumen ratings are appealing but can be deceiving. Overly bright projectors without proper contrast can wash out details. Focusing on balanced specs like contrast ratios and color fidelity yields truer, more immersive images. This insight prevented me from wasting money on unnecessary brightness and helped me find the perfect balance.
- Calibration isn’t a one-time fix: Regular tweaking, especially after firmware updates or bulb replacements, keeps your picture pristine. Ongoing calibration, using specialized tools, ensures consistent performance and prolongs the lifespan of your equipment. It’s a commitment that pays off in unmatched viewing quality.
My Go-To Resources for a Better Viewing Experience
- Ultimate 4K projector buying guide: This comprehensive resource helped me understand the nuances of contrast, HDR, and lens options, leading to smarter purchasing decisions. It’s a cornerstone for anyone serious about home theater optimization.
- Calibration guides and tools like SpyderX: Investing in calibration devices and following detailed tutorials elevated my picture quality significantly. Trusted resources that demystify technical processes, making advanced calibration accessible.
- Lighting and room design advice: I rely on expert articles about ambient light management and wall surface choices. Implementing their suggestions created an environment where visuals shine regardless of external light.
- Industry forums and user communities: Engaging with fellow enthusiasts exposed me to tips, troubleshooting tricks, and latest trends that kept my setup evolving with technology.
Your Personalized Path to Home Theater Brilliance
Embarking on your home theater journey with a 4K projector, ultra short throw, or laser model is exciting—and a bit overwhelming. Remember, the most impressive setups are tailored to your space, preferences, and routine. Focus on proper calibration, room optimization, and ongoing maintenance. As you refine your environment and settings, you’ll discover a visual experience that’s richer and more immersive than any ordinary TV. Don’t hesitate to experiment, learn from trusted resources, and enjoy the process. Your perfect cinematic escape is within reach—start today! Have you faced challenges in calibrating your projector or managing room lighting? Share your experiences below and let’s elevate our home theaters together.