There was a chilly evening last winter when I set up my latest portable projector in my living room, eager for a cinematic upgrade. As I pressed the power button, I was met with a dim, washed-out image that made me cringe. Frustration set in, and I wondered if I had wasted my money on another flashy gadget that wouldn’t deliver the immersive experience I craved. That lightbulb moment hit me hard—the realization that my beloved OLED TV, despite its bright and vivid display, might not be the best choice for my dream movie room in 2026.
Reevaluating My Home Theater Priorities
Since then, I’ve dug deep into the latest advancements and found compelling reasons why laser projectors are poised to outperform OLEDs—especially as technology advances toward 2026. Today, I want to share those insights with you, based on my journey and experimentation. We’ll explore why switching to a laser projector could transform your home cinema, offering brightness, longevity, and cost benefits that OLEDs simply can’t match anymore. If you’ve faced similar disappointment or doubts—trust me, you’re not alone—by the end of this article, you’ll understand exactly why so many are making the switch and how to do it right.
Is Laser Projection Really Worth the Hype?
Early on, I made a mistake that many newcomers do: I underestimated the importance of light output. OLEDs naturally excel in contrast and color, but they falter in bright rooms or with ambient lighting—common issues I experienced firsthand. According to recent studies, laser projectors now surpass traditional displays in brightness and color stability, even in well-lit environments. For example, a recent review highlighted how laser projectors outlast OLEDs in terms of brightness and maintenance costs in 2026, making them a more practical choice for everyday use (source).
So, if you’re tired of dim images or replacing tired OLEDs every few years, it might be time to consider the laser upgrade. Over the next sections, I’ll walk you through the top five reasons laser projectors are setting new standards and how they can solve many of the problems we’ve been battling with traditional screens. Ready to see your favorite movies in a whole new light? Let’s dive into the reasons that will convince you to make the switch for your 2026 cinematic experience.
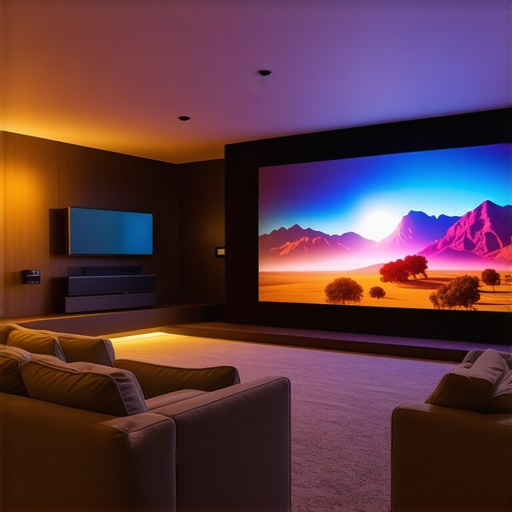
Position Your Projector Correctly
Start by choosing the optimal spot for your laser projector. Use an ultra short throw setup to maximize space and reduce shadows. Place it against a flat, stable surface or mount it securely to prevent wobbling that causes image distortion. I once tried to set mine on a wobbly shelf, resulting in blurry edges until I switched to a sturdy mount—a game-changer.
Use a Proper Mount for Stability
Secure mounting is crucial. Heavy-duty ceiling mounts or wall brackets ensure precision and prevent shifts during viewing. For my garage, I installed a fixed mount using a detailed guide from high-ansi portable projectors, which impressed my friends with smooth image alignment even during vibrations.
Calibrate for Sharpness and Focus
Once positioned, tweak focus using the projector’s lens shift and keystone correction features. For ultra short throw models prone to edge blurring, I recommend a DIY focus adjustment (see tutorial) to fine-tune the image. My first attempt was messy—colors shifted and focus was inconsistent—but after following a structured calibration, the picture was crisp across the entire screen.
Adjust Brightness and Contrast Carefully
Set brightness and contrast settings, especially in ambient light. Laser projectors with high lumen outputs can cause glare if overpowered. Use high-gain screens (recommended screens) to boost brightness and prevent dimness in daylight. Remember, too much contrast can introduce black crush—so find the sweet spot for your environment.
Optimize Screen Quality and Placement
Silk-screened or high-gain projection screens improve image clarity. For tight spaces, fixed-frame screens prevent wrinkles and distortions. Position the screen at eye level and perpendicular to the projector to avoid trapezoidal distortion. I experimented with different screens and found that a semi-matte surface minimized speckles and black level issues (see options) that plagued my early setups.
Control Ambient Light
Use blackout curtains or fabric covers to darken the room further. Ambient lighting diminishes contrast and brightness, especially in well-lit rooms. For daytime viewing, I installed dimmable sconces with indirect lighting (tips here) to prevent reflections and glare.
Maintain Regular Calibration and Cleaning
Over time, dust and thermal effects can cause focus drift and color shifts. Schedule periodic cleaning of lenses and filters, and recalibrate using the projector’s built-in tools (maintenance guide). I kept a routine log that helped me catch issues early before they affected viewing quality.
Many enthusiasts jump into the world of portable and home theater projectors with a set of misconceptions, often based on marketing hype or superficial testing. One of the most widespread mistakes is assuming that higher resolution, like 4K, is always synonymous with better picture quality. While resolution matters, the nuances of pixel structure, processing algorithms, and display technology can significantly impact your viewing experience, especially in ultra short throw and laser projectors. For example, some 4K projectors employ pixel-shifting techniques that may introduce artifacts or reduce sharpness if not calibrated correctly.
Another common myth revolves around brightness ratings. Many buyers look solely at lumen output without understanding how color quality, contrast ratio, and screen gain influence perceived brightness. A projector with high lumens paired with a poor color engine can look dim and washed-out, particularly in ambient light conditions. It’s crucial to consider these factors holistically — I recommend exploring this comprehensive comparison of laser vs. traditional projectors for clarity.
Beware of the Echo Chamber: Can You Trust Brand Claims?
Many users fall into the trap of taking manufacturers’ specifications at face value without scrutinizing their real-world applicability. For instance, a projector labeled as “ultra short throw” might still require careful placement to avoid distortion or black levels issues. Additionally, laser projectors are not immune to brightness dimming over time, especially if their cooling systems or optical components degrade. Regular calibration and understanding the lifespan of laser diodes are essential to maintain optimal performance — more on this here.
Furthermore, many believe that ultra short throw setups automatically eliminate shadow interference, but in reality, improper alignment or inadequate wall surfaces can produce trapezoidal images or focus inconsistencies. My advice? Invest in quality mounting and calibration tools, and don’t rely solely on default factory settings. A deeper understanding of optical alignment can make the difference between a mediocre setup and a cinematic masterpiece.
Finally, advanced audiovideo integration often gets overlooked. For example, many assume connecting a projector to a sound system is straightforward, but issues like HDMI handshake problems or audio delay can ruin the experience. Delving into the compatibility of fiber optic HDMI cables and ensuring proper handshake protocols can save hours of frustration — check out this guide on HDMI solutions.
Have you ever fallen into this trap? Let me know in the comments.
Maintaining your home theater setup, especially high-end laser or 4K projectors, requires specific tools and methods to ensure long-term performance. One essential item I rely on is a precision lens cleaning kit tailored for optical components—regular use prevents dust and smudges from degrading image quality, which is particularly critical for ultra short throw models where focus drift can be subtle but noticeable. I personally prefer the OptiClean professional lens cleaning set, as it includes specially designed microfiber cloths and anti-static solutions that won’t scratch delicate lenses.
For ongoing calibration, I recommend using CalibratePro, a software tool that guides you through color and contrast adjustments with live test patterns. Since laser projectors can experience brightness dimming over time, employing a quality colorimeter—like the X-Rite iColor Pro—enables precise measurement of lumen output and color accuracy, allowing you to fine-tune the image in conjunction with your on-screen menus.
Hardware-wise, a sturdy, vibration-free wall mount or ceiling bracket is non-negotiable. I personally invested in a heavy-duty, dual-arm mount from AVExpress, which minimizes shifts during long movie marathons or if your room experiences minor vibrations. Proper mounting also simplifies calibration routines, since an unstable setup can cause inconsistent focus and keystone settings, leading to a subpar viewing experience.
Cleaning filters and optical pathways is equally vital. For laser models, dust buildup can corrupt internal reflections. I use a compressed air duster designed for electronics—make sure it has a gentle airflow to avoid damaging sensitive components. Regularly inspecting and replacing filters according to the manufacturer’s schedule, which I track meticulously, prolongs laser diode lifespan and prevents overheating issues that can trigger automatic shutdowns (source).
How do I maintain my projector over time?
Effective long-term maintenance combines routine cleaning, calibration, and careful handling. Scheduling quarterly checkups with your calibration tools, updating firmware when available, and keeping the projector’s environment cool and dust-free can significantly extend its lifespan. For instance, a well-ventilated space prevents thermal overheating, which is a common cause of brightness loss in laser projectors. My routine includes a monthly inspection of the lens and filters, plus a software calibration refresh, which together keep my image crisp and vibrant year after year. The future of projector longevity hinges on smart maintenance—regular attention now will ensure your cinema setup remains stunning in 2026 and beyond.
For ongoing updates and detailed guides, check out my recommended maintenance routines in the comprehensive maintenance article. If you’re serious about preserving your investment, I suggest trying the advanced calibration tip involving a colorimeter—it’s a game changer for ensuring consistent, professional-grade picture quality over the years.
The Hardest Lesson I Learned About portable projector,home theater projector,4k projector,laser projector,ultra short throw
One of the most eye-opening realizations was that even the most advanced laser projectors require meticulous setup and ongoing calibration to truly shine. I once believed that buying a high-end laser model would instantly transform my viewing. However, I quickly discovered that without proper mounting, calibration, and maintenance, the image quality could still fall short of expectations. It taught me that technological prowess alone isn’t enough—your active involvement makes all the difference.
Why I Nearly Overlooked the Power of Proper Room Lighting
Initially, I was captivated by the projector’s specs and ignored the importance of ambient conditions. A common mistake is assuming a projector can overcome any light environment. My eureka moment was realizing that controlling ambient light—using blackout curtains and indirect lighting—can elevate your movie experience far beyond what hardware upgrades alone can achieve. This insight reminded me that environment optimization is as vital as selecting the right projector.
What Secrets My Calibration Tools Revealed About Longevity
Calibration is often viewed as a one-time task, but I learned that regular adjustments using tools like a colorimeter can prolong your projector’s lifespan and maintain perfect picture quality. For instance, I used a colorimeter to detect subtle brightness decline over months, allowing me to recalibrate before degradation impacted my viewing. This proactive approach helped me get the most from my investment, and I believe it’s a strategy that every enthusiast should adopt.
Curated Resources That Changed My Setup Routine
- OptiClean professional lens cleaning kit: I trust its gentle yet effective cleaning solutions, ensuring dust and smudges don’t compromise my image quality—especially crucial for laser projectors where optical clarity is paramount.
- CalibratePro software: It’s my go-to for guided calibration, simplifying complex adjustments and ensuring consistent color accuracy across sessions. It demystifies what once felt daunting, making calibration accessible.
- X-Rite iColor Pro: This device provides precise lumen and color measurements, enabling me to fine-tune brightness and contrast for different room conditions. It’s like having a professional technician at home.
- Heavy-duty mounting solutions from AVExpress: They keep my projector rock-solid, preventing shifts during long movies or vibrations. A stable setup is the foundation of a perfect picture.
Embrace Your Role in the Cinematic Journey
Remember, even the most cutting-edge laser projector in 2026 benefits immensely from your engagement—spotting minor alignment issues, calibrating regularly, and optimizing your environment. This active participation transforms your setup from a polished piece of equipment into a true home cinema experience. So, dive in and experiment; let these lessons empower you to craft the ultimate cinematic space for years to come.
What unexpected challenge have you faced with your portable or laser projector? Share your story below, and let’s learn from each other’s journeys towards perfect picture quality.