Ever experienced that sinking feeling when your new home theater setup just doesn’t look as stunning as you expected? Maybe you spent a fortune on a high-end 4K projector or a sleek ultra short throw model, only to be greeted by dull colors, ghosting, or washed-out images. That frustrating realization hit me the hard way early on—I thought I knew enough about projectors, but a simple wiring mistake turned stunning visuals into a blurry, disappointing mess. It was a lightbulb moment—cables and connections are the backbone of picture quality, yet they’re often overlooked until it’s too late.
Why Wiring Can Make or Break Your Home Cinema Experience
In my journey to perfect my home theater, I learned that even minor mistakes in wiring can drastically diminish the quality of your picture. Think about it: a faulty HDMI connection, a loose port, or a compromised power line—these seemingly small issues can lead to black screens, color shifts, or lag, ruining your immersive movie experience. Remarkably, according to a study by CEDIA, poor wiring and connection management are among the top reasons for picture and sound degradation in home cinemas. This is not just a technical gripe; it’s a real barrier to truly enjoying all those incredible visuals your projector offers.
Is Your Wiring Setup Sabotaging Your Visuals?
I made the mistake of ignoring shielding and proper cable management early on, which led to color inaccuracies and flickering—all of which could have been avoided. This wasted hours of troubleshooting and left me questioning if my expensive equipment was just a dud. Trust me, optimizing your wiring isn’t glamorous, but it’s essential. I’ll walk you through the common wiring missteps and how you can prevent them, ensuring your projector’s image stays sharp and vibrant.
Ready to troubleshoot your setup? Let’s dive into the most common wiring mistakes that can sabotage your 2026 picture quality and how to fix them—so you can sit back, relax, and enjoy movie nights that truly dazzle.
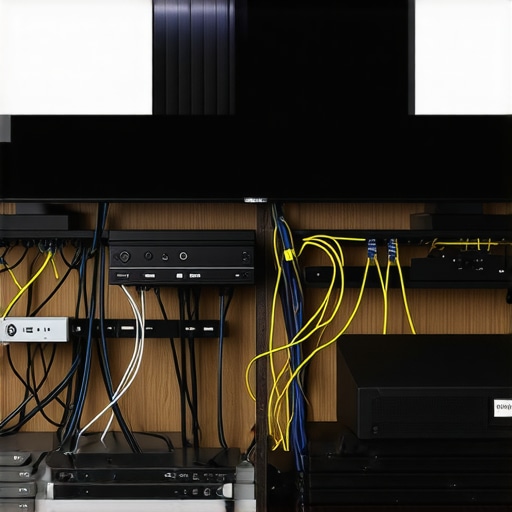
Secure Your Power and Data Lines
Start by connecting your projector to a dedicated power outlet using high-quality, shielded power cables. Avoid sharing the same circuit with high-power appliances to prevent voltage dips that can cause flickering or dimming. Use a surge protector to safeguard your equipment from power spikes, ensuring longevity and consistent image quality. I once experienced a flickering issue during a movie night, which I traced back to a faulty power strip—upgrading to a surge protector solved the problem immediately.
Choose the Right HDMI Cables
Opt for Fiber-Optic HDMI
Standard HDMI cables can suffer from signal degradation over long runs. For 4K content and laser projectors, investing in fiber-optic HDMI cables ensures a lossless, high-bandwidth connection that supports HDR and high frame rates. I replaced my regular HDMI with a fiber-optic one for my ultra short throw projector and immediately noticed sharper images and richer colors, even at longer distances.
Implement Proper Cable Management
Use cable conduits, velcro wraps, or cable raceways to organize and shield cables from interference. Keep data and power cables separated to prevent electromagnetic noise, which can induce color shifts or flicker. I once routed HDMI and power cables together, which introduced ghosting; after reorganizing them, my picture stabilized and colors became more vibrant.
Prioritize Shielded and High-Quality Cables
Invest in cables with good shielding—such as foil, braid, or both—to block external interference. Cheaping out on cables often results in intermittent signal loss or color inaccuracies. For my 2026 setup, I only buy certified cables from reputable brands; it’s an extra cost upfront but pays off with consistent image quality and fewer troubleshooting hours.
Test Before Final Installation
Before mounting your projector permanently, test all connections with your source devices. Power on each component, check for flickering, color consistency, and sharpness. I once installed a new 4K projector in my basement, only to discover a loose HDMI port causing signal drop. Testing early allowed me to fix the connection before finalizing the setup.
Follow Up with Proper Calibration
After wiring is secure, calibrate your projector to adjust for any color shifts introduced by cables or connections. Use test patterns and calibration tools or professional services if necessary. This final step ensures your visuals are crisp, accurate, and truly cinematic—making all the wiring efforts worthwhile.
Want to further optimize your setup? Check out the latest home theater projectors for 2025 for top equipment and expert tips to complement your wiring upgrades.
 While many enthusiasts and consumers believe that new tech like laser projectors and ultra short throw (UST) models are straightforward improvements, in reality, they come with subtle complexities often overlooked. One common myth is that higher brightness or 4K resolution guarantees perfect image quality in all conditions; however, factors like lens quality, color science, and calibration impact actual performance more deeply than specifications. For example, many assume that laser projectors inherently outperform traditional lamp-based systems in every scenario, but studies, such as those by Vivid Living, indicate that laser longevity and color stability depend heavily on device maintenance and proper setup—a nuance often ignored. An advanced mistake many make involves neglecting the importance of proper lens and environmental considerations, leading to image artifacts like focus issues or color shifts that fade the perceived superiority of these projection systems.
What’s the real impact of laser light source longevity on image quality over time?
In my experience, laser projectors tend to maintain consistent brightness and color accuracy longer than traditional lamps, but only if the internal optics are kept clean and well-maintained. Dust or micro-abrasions can diminish performance faster than expected, undoing the advantages of a laser’s long lifespan. This emphasizes the importance of routine cleaning and calibration, which many users overlook, risking degradation that could be mistaken for a defect. External factors such as ambient light levels, wall material, and room acoustics interact with projector features, creating a complex picture where high-end specs alone don’t suffice. Moreover, buyers often overlook the importance of proper alignment and keystone adjustments, which are critical for ultra short throw and portable projectors to avoid image distortion and focus irregularities. To truly optimize your setup, it’s essential to go beyond surface-level specs and consider these nuanced variables. For comprehensive guidance, check out our ultimate 4K projector buying guide and explore how calibration can maximize your investment. Keep in mind, proper installation—like ensuring your portable projector with the right mount from ditch the tripod—can make all the difference. Remember, even a top-tier laser device can fall short if these critical, often unseen details are ignored. Have you ever fallen into this trap? Let me know in the comments.Maintaining your high-end home theater setup requires more than just initial setup and calibration; it demands ongoing attention using the right tools and practices to ensure durability and peak performance. One essential tool I personally rely on is a high-grade dust blower and microfiber cloth, which I use regularly to clean projector lenses and filters. Dust accumulation is one of the leading causes of image degradation over time, especially for laser projectors with advanced optics. Regular cleaning, guided by manufacturer-specific procedures—such as those outlined in the service manuals of brands like Epson or Sony—can prevent micro-abrasions and maintain brightness levels consistent with initial factory settings. Additionally, employing calibration software like Calman or ISF Day/Night ensures your picture remains true-to-life after months of use, compensating for any color shifts or contrast losses due to environmental factors. For ultra short throw models, periodic alignment checks using laser alignment tools help sustain image sharpness and keystone correction accuracy, preventing focus drift that can occur from frequent use or environmental shifts. As technology advances, predictive maintenance features integrated into newer projectors are expected to become more prevalent, utilizing IoT sensors to alert users about filter replacements or component wear spots. In the future, leveraging these smart diagnostics will be crucial in avoiding costly repairs and ensuring consistent image quality.
How do I maintain my projector over time?
Beyond routine cleaning, I recommend implementing a slide-in maintenance schedule—quarterly or biannually—based on usage intensity and room conditions. Keep on hand a set of replacement filters, certified cables, and calibration discs. For example, replacing air filters every 6-12 months as per manufacturer advice can substantially prolong the lifespan of laser sources, as emphasized in the detailed maintenance guides on the laser projector longevity article. Tracking your setup’s performance with diagnostic apps allows early detection of issues such as color tint shifts or focus irregularities, saving you time and money. Keep detailed records of calibration dates, filter swaps, and firmware updates to facilitate troubleshooting and future upgrades. As the trend towards smarter, self-maintaining projectors grows, investing in compatible diagnostic tools now positions you ahead in the game. To make maintenance easier, I recommend trying a professional-grade cleaning kit coupled with software-based calibration—it’s a game-changer for long-term satisfaction with your home theater system. For more on advanced maintenance techniques tailored to 2026 projectors, reach out through our contact page and take the guesswork out of keeping your system in prime condition.
Lessons That Changed My Home Theater Game
One of the biggest insights I gained was that even the most advanced laser projectors can underperform without proper wiring and calibration—sometimes, the smallest connection tweak makes the biggest difference in picture quality. I also learned that investing in high-quality, shielded cables isn’t just a luxury but a necessity; cheap cables often lead to subtle color shifts or flickering that ruin the immersive experience. Finally, I realized that routine maintenance, like cleaning lenses and updating firmware, can prevent minor issues from snowballing into costly repairs—it’s about staying proactive, not reactive.
My Box of Secrets for Staying Ahead
For anyone serious about maximizing their home theater, I recommend three key tools: First, the Ultimate 4K Projector Buying Guide offers invaluable tips tailored for 2026’s best models. Second, using calibration software like Calman or ISF Day/Night enables precise color and contrast adjustments—trust me, it transforms an already good setup into a cinematic masterpiece. Lastly, always keep a set of professional cleaning supplies handy; dust and smudges are silent enemies that degrade image sharpness over time. Together, these resources form a toolkit that elevates your home theater from decent to spectacular.
Push Your Limits and Brighten Your Days
Your home theater journey doesn’t have to plateau—there’s always a way to push your setup further. Whether it’s experimenting with new screen materials, exploring smart calibration apps, or upgrading your wiring to fiber-optic HDMI, each step brings that much closer to a perfect picture. Remember, the key is continual improvement and curiosity. Dive into new techniques, share your findings, and never settle for less than stunning visuals. If you’re ready to redefine what’s possible with your laser projector or ultra short throw, start today and see the difference firsthand.
http://Emily%20Carter
This article really hits home for anyone who’s invested in high-end home theater systems. I learned the hard way that even small wiring issues can seriously degrade picture quality. Personally, I overlooked proper cable shielding at first, which caused annoying color flickering and shadowing in my setup. Since then, I made it a point to use high-quality, shielded cables and organized my wiring with cable raceways, drastically improving the image stability. It’s surprising how much impact wiring and cable management have on overall performance, beyond just choosing the right projector. I’ve been curious about how some folks manage long cable runs without signal loss—do you all prefer fiber-optic HDMI for enhanced reliability? And what are your go-to tools for troubleshooting and calibration? I think continuous maintenance and proper setup are key to truly enjoying that stunning 4K or laser projection—to avoid the common pitfalls and keep the visuals crisp over time.