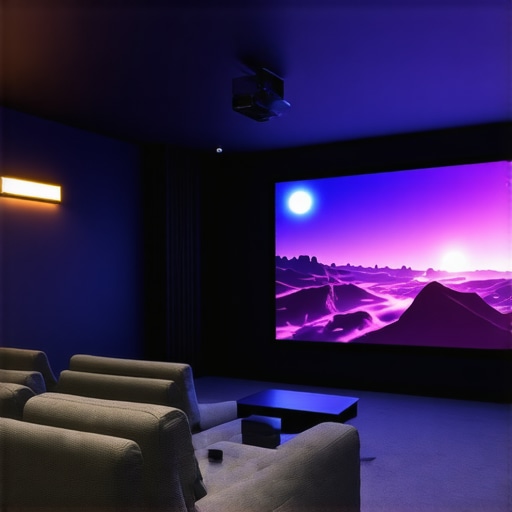
I’ll never forget the moment I realized my living room was just too cramped for a traditional projector setup. I had dreams of a big, cinematic screen that felt like a real theater experience, but every attempt to set up a standard projector ended in frustration—poor image quality, awkward placement, or just not enough space. It was a lightbulb moment when I discovered ultra short throw (UST) and laser projectors. Suddenly, my small space transformed into a cozy home theater, and I wondered how many others are still stuck with outdated setups that don’t really work.
Why Your Small Space Needs a New Approach to Projectors
Let’s face it—most homes aren’t designed with dedicated theaters in mind. Tiny apartments, multi-purpose living rooms, or even bedrooms often leave you feeling limited when trying to enjoy big-screen entertainment. Conventional projectors require distances that simply aren’t feasible in tight quarters. That’s where ultra short throw projectors come in. They sit just inches from your wall or screen, projecting massive images without the need for a cavernous space.
And then there’s the magic of 4K resolution combined with laser technology. Not only do these projectors deliver stunning clarity, but they also offer vibrant colors and bright images—even in well-lit rooms. According to a recent report, laser projectors are now surpassing traditional lamp-based models in brightness and longevity, making them a smart choice for home theaters that need to perform under everyday lighting conditions.
If you’ve been hesitant about upgrading because you’re worried about cost, complexity, or whether these tech marvels are just hype—trust me, I’ve been there. Early on, I made the mistake of buying a cheap, underwhelming projector that promised big things but delivered dull images and constant maintenance. That experience taught me the importance of investing in quality, especially in a space where you want to unwind and enjoy your favorites without distraction.
So, what’s the plan? Today, I’ll help you cut through the noise and find the best ultra short throw and 4K laser projectors for your home in 2024. We’ll go over the key features, what to look out for, and how to choose a model that fits your space—and your budget. Ready to turn that small room into a cinematic oasis? Let’s dive in.
Is the Hype About Ultra Short Throw and Laser Projectors Real?
Honestly, it’s a common concern. Are these projectors just the latest buzzword, or do they genuinely deliver on their promises? Early in my journey, I bought into the hype without doing enough homework and ended up disappointed. The key is knowing what features truly matter, such as brightness, resolution, and throw distance. For a detailed comparison, check out the laser vs traditional projectors guide. Once I understood what to look for, I was able to pick a model that changed my home viewing experience for good.
Pick the Right Projector for Your Space
Start by assessing your room size and lighting conditions. Ultra short throw projectors sit just inches from your wall, so measure the available space to ensure they fit comfortably. For bright rooms, prioritize models with high lumen output—look for at least 2500 lumens—to ensure vivid images even during daytime. Dive into reviews and specs at best 4K laser UST projectors to find options that balance cost and performance.
Prepare Your Wall or Screen
Since UST projectors project images just inches away, your wall surface quality directly impacts picture clarity. Smooth, matte, white or light gray walls work best. If your wall has imperfections, consider a dedicated projector screen—this guarantees sharpness and color accuracy. For a quick upgrade, use a peel-and-stick screen material or a projector screen paint kit. To visualize the setup, refer to ultimate guide to UST projectors.
Mount or Place the Projector
Position your projector on a sturdy surface or mount it on the ceiling if possible. For the best image quality, follow specific throw distance guidelines—most models specify the ideal distance from wall for a given image size. Use a tape measure and level to ensure proper placement. Remember, in tight spaces, a flexible mounting bracket can make adjustments easier. I once struggled with placement until I realized that a simple adjustable mount allowed me to fine-tune the image perfectly—saving me hours of trial and error.
Connect and Calibrate for Clarity
Connect your streaming device, gaming console, or Blu-ray player to the projector. Use high-quality HDMI cables for the best signal. Once connected, access the projector’s menu to adjust keystone correction, focus, and image size. Many models offer auto-calibration features—use these to streamline setup. Don’t forget to tweak color settings—aim for vibrant yet natural tones. I recommend starting with the default settings, then fine-tuning based on your room’s lighting. This step ensures your movies look cinematic, not washed out or overly dark. For detailed calibration tips, explore ultimate guide to 4K UST projectors.
Optimize Lighting and Sound
Control ambient light by drawing curtains or using dimmable lights. UST projectors excel in small rooms because they can combat glare with their high brightness. For audio, invest in a soundbar or surround system—built-in speakers often aren’t enough for a true home theater experience. Position your speakers for even sound distribution, and test the volume levels. When I upgraded my setup, adding a soundbar transformed my movie nights, making everything feel more immersive. Check out portable UST projectors for options that include integrated audio solutions.
Maintain Your Equipment
Keep your projector clean and dust-free. Regularly check the lens and vents, and replace filters if needed. Firmware updates can improve performance and add features—consult your model’s manual or manufacturer website. Proper maintenance prolongs the lifespan of your investment and keeps your picture sharp and bright for years. Remember, a well-maintained projector is the backbone of your cinematic experience.
Many enthusiasts get lulled into thinking that upgrading to an ultra short throw (UST) or laser projector automatically guarantees a perfect home theater setup. While these technologies do offer remarkable benefits, such as compatibility with small spaces and vibrant 4K images, there’s a common misconception that they are foolproof solutions. In reality, overlooking certain nuances can lead to costly mistakes and subpar experiences.
One of the most underestimated issues is the importance of wall surface quality. A high-lumen laser projector paired with a rough or uneven wall can produce blurry, washed-out images, defeating the purpose of investing in premium tech. Many assume that brightness alone will compensate for poor surfaces, but in practice, a smooth, matte white or light gray wall or a dedicated screen is essential for optimal clarity. If you’re considering a move to an UST projector, don’t skip this crucial step.
Are Brightness and Resolution Enough to Guarantee Quality?
Contrary to popular belief, high brightness and 4K resolution do not automatically mean a perfect picture. Many users fall into the trap of focusing solely on lumens or pixel count, neglecting calibration and environmental factors. For instance, a bright projector in a room with strong ambient light or reflective surfaces can still produce dull images. Proper calibration, ambient lighting control, and even the choice of screen material can significantly enhance visual quality. Experts suggest that a well-calibrated projector in a controlled environment beats a spec-heavy setup that’s poorly adjusted. To get the best out of your investment, I recommend exploring detailed calibration tips in our ultimate 4K projector buying guide.
Another misconception is that the latest tech always outperforms older models. While newer projectors may boast better specs, they can also introduce complexity—like more intricate menus or auto-calibration features—that might be overwhelming or unnecessary for casual users. Sometimes, a carefully set-up mid-range projector can outperform a top-tier model left uncalibrated or misused. Remember, technology is only as good as its application.
Finally, many overlook the importance of sound. A stunning picture with mediocre audio can ruin the experience. Investing in a quality soundbar or surround sound system and positioning it correctly is just as crucial as choosing the right projector. Good audio complements high-quality visuals and immerses you into the cinematic world. For portable solutions, consider models with integrated audio, but always test the sound quality before finalizing.
In summary, the key nuance that most overlook is that technology alone doesn’t deliver a perfect home theater. Wall surfaces, calibration, ambient lighting, and audio setup are equally vital. Avoid falling into the trap of focusing solely on specs, and instead, pay attention to the environment and calibration to truly unlock the potential of your ultra short throw or laser projector. Have you ever fallen into this trap? Let me know in the comments.
Maintaining your home theater projector, especially one equipped with advanced features like laser technology and ultra short throw capabilities, is crucial for ensuring long-term performance and image quality. Over time, dust accumulation, firmware updates, and calibration drift can impact your viewing experience. I personally rely on a combination of professional tools and best practices to keep my projector in peak condition, and I recommend these to anyone serious about their home cinema setup.
How do I maintain my projector over time?
Regular cleaning is the foundation of good maintenance. Use a microfiber cloth to gently wipe down the lens and vents, preventing dust from settling and causing overheating or image degradation. For deeper cleaning, I use a compressed air canister to blow out dust from internal components. This prevents dust buildup on fans and filters, which can reduce brightness and cause noise issues. Many projectors have removable filters—consult your manual to see if yours does, and replace or clean them as recommended by the manufacturer.
Firmware updates are often overlooked but are essential for optimal performance. Manufacturers periodically release updates that enhance image processing, add new features, or fix bugs. I make it a point to check the manufacturer’s website or subscribe to their update alerts. Installing these updates typically involves downloading a file onto a USB stick or connecting via Wi-Fi, depending on your model. This simple step can significantly improve image clarity and system stability.
Calibration tools are a game-changer for maintaining picture quality. I swear by using a color calibration disc like the Datacolor SpyderX to fine-tune my projector’s color output. Proper calibration ensures vibrant yet natural colors, especially important when using high-end models like those found in 4K laser projectors. For ongoing calibration, I use software like CalMAN, which guides me through adjustments for brightness, contrast, gamma, and color balance. This process keeps the image sharp and true to life, even after months of use.
Additionally, regular checkups of the mounting and connections prevent issues. Ensure the projector is securely mounted and that HDMI or other cables are firmly connected. Loose connections can cause flickering or loss of signal, undermining your viewing experience. When I notice a flicker, I switch out the cable with a high-quality, gold-plated HDMI cable—this small upgrade often solves the problem and ensures stable signal transmission.
Future of projector maintenance and scaling
Looking ahead, I predict that smart home integration and AI-driven calibration will become standard. Future projectors may automatically detect dust buildup or calibration drift and prompt you for maintenance or even perform self-corrections. As technology advances, maintaining your equipment will become more seamless, allowing you to enjoy flawless picture quality with minimal effort.
To get started today, I recommend trying an automatic calibration tool like CalMAN or LightSpace, which can dramatically improve your picture without professional help. Regular maintenance not only prolongs your projector’s lifespan but also keeps your home cinema experience consistently top-notch. Want to learn more? Visit our ultimate guide to 4K projectors to explore advanced setup and maintenance tips.
What I Wish I Knew Before Going All-In with Ultra Short Throw Projectors
One of the biggest lessons I learned was that wall quality is everything. I assumed a high-brightness laser projector would shine through any surface, but a rough wall or uneven paint seriously dulls the image. Investing in a dedicated screen or at least a smooth, matte surface transformed my viewing experience. Another insight was how crucial proper calibration is—initially, I set everything to default and wondered why my colors looked off. Learning to fine-tune contrast, gamma, and color balance made my movies pop like a real theater. Lastly, I underestimated ambient light management. Even in small rooms, controlling stray light with curtains or dimmable lamps can make a huge difference, especially when using a projector that relies on brightness and clarity to shine in everyday conditions.
My Top Tools for Creating the Perfect Home Theater Setup
To ensure my projector performs at its best, I rely on the Ultimate Guide to 4K UST projectors for detailed calibration techniques. For wall surfaces, I trust premium projector screens that enhance clarity and color accuracy. When it comes to maintaining my equipment, firmware updates from the manufacturer’s site and using calibration tools like the Datacolor SpyderX have kept my image sharp and vibrant. Lastly, I recommend checking out the best portable projectors list for options that combine convenience with power, especially if space is a constraint.
Your Next Step in Small Space Cinema Is Just One Click Away
Embracing the right projector technology, like ultra short throw and laser models, can truly revolutionize your small space into a cinematic haven. It’s about more than just tech—it’s about creating an environment that invites you to unwind, enjoy, and escape into your favorite movies or games. Remember, the journey to a perfect home theater is ongoing, and every upgrade or calibration brings you closer to the experience you deserve. So go ahead—take that first step, experiment with setups, and make your small space a big-screen sanctuary. What part of your home cinema setup are you most excited to improve? Share below, and let’s grow together in this journey!
http://Rachel%20Montgomery
I completely relate to the experience of trying to squeeze a traditional projector into a small space only to be disappointed. When I switched to an ultra short throw model, it was like upgrading to an entirely new level of home entertainment—no more needing a huge room to get that cinematic feel. The part about wall surface quality really hit home for me; I used to think brightness was enough, but studying the importance of a smooth, matte surface made a huge difference in my picture quality. Calibration also made a significant impact—initially, I just set everything on auto, but customizing the settings truly enhanced the colors and contrast.
For those dealing with limited space, what wall treatments or surfaces have others found to be most effective without breaking the bank? I’d love to hear tips on affordable solutions or DIY methods to get a better display in tight rooms.
http://Michael%20Carter
I really appreciate this detailed breakdown. I recently upgraded to an ultra short throw projector in my apartment, and it’s been a game changer for my small space. One thing I’ve learned along the way is that the placement and wall surface truly make or break the picture quality. I used to think that high lumen output alone was enough, but after experimenting with different wall surfaces, I found that a smooth matte finish is essential for sharp, vibrant images. DIY wall treatments, like affordable peel-and-stick paint or specially designed fabric, can be quite effective if you’re budget-conscious. Has anyone tried using DIY solutions to enhance their wall surface? I’d love to hear what’s worked without breaking the bank.
http://Samantha%20Lee
Reading about the importance of wall surface quality really resonated with me. I used to focus solely on brightness and resolution, but I found that even a top-tier projector can’t shine its brightest on an uneven or textured wall. I repainted my wall with matte white paint, which made a huge difference in clarity and color vibrancy. For those on a tight budget, I’ve tried DIY solutions like using a large piece of matte fabric or applying projector screen paint, which is surprisingly affordable and effective. Have others found particular wall treatments or coatings that give a noticeable boost without extra expense? It’s interesting how such small adjustments can significantly enhance the overall viewing experience.