Last year, I almost gave up on creating my perfect home theater. My living room was cluttered, and every projector I tried either looked washed out or took up half the space. That was until I stumbled upon the magic of 4K laser and ultra-short throw (UST) projectors. Suddenly, my small space transformed into a cinematic sanctuary. But here’s the thing: with so many options flooding the market in 2024, how do you pick the right one? Believe me, I’ve made my share of mistakes early on—buying the wrong projector can be a huge waste of money and disappointment. That’s exactly what I want to help you avoid today.
Why 2024 is the Year to Upgrade Your Home Theater
Home cinema technology is evolving faster than ever. In the past, big-screen TVs were the only option for a true cinematic experience. But now, portable ultra-short throw projectors and laser projectors are making top-tier picture quality accessible in small spaces. These innovations mean you don’t need a dedicated room or massive budget anymore—just a cozy corner and the right gear. This is why I believe 2024 is the perfect time to upgrade, especially if you’re craving that immersive, cinematic feel at home.
Are 4K Laser Projectors Actually Worth the Hype?
When I first started exploring, I was skeptical. I thought, “Isn’t this just fancy marketing?” Well, I learned the hard way that not all projectors are created equal. Early on, I bought a budget projector that promised 4K but delivered blurry images and poor contrast. It was a costly mistake, and I wish someone had told me to focus on laser tech and ultra-short throw capabilities. These features actually make a difference—offering brighter images, sharper details, and the convenience of projecting from a few inches away instead of mounting on the ceiling. If you’re serious about a cinematic experience, investing in the right 4K laser or UST projector is worth it—especially in 2024, when models are more advanced and affordable than ever.
Curious about which models stand out? I’ll walk you through the top picks and help you make an informed decision. But first, let’s address the common worries many have about this tech.
Measure Your Space Carefully Before Buying
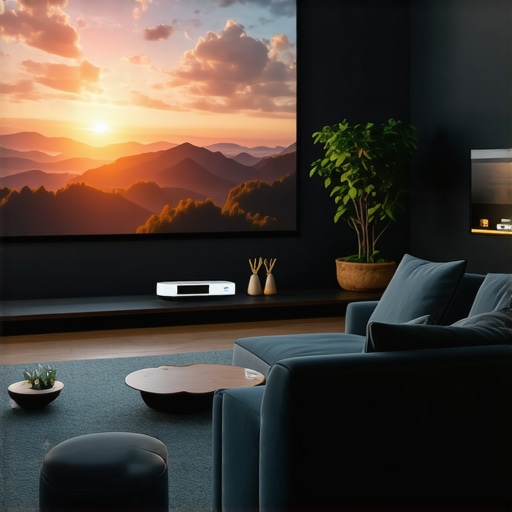
Start by evaluating the dimensions of your room. Use a tape measure to determine ceiling height, wall size, and the distance from where you plan to place the projector. I once rushed into buying a projector without measuring, only to realize it couldn’t fit in my small living room. To avoid this, sketch out your space or use a room-planning app. For ultra-short throw projectors, ensure your wall is flat and free of obstructions, as these projectors need minimal throw distance but are sensitive to wall imperfections. Check out how ultra-short throw projectors transform small spaces for tips on optimizing your room layout.

Choose the Right Brightness and Contrast
Brightness, measured in lumens, is crucial for clear images, especially if your room isn’t perfectly dark. In my case, I learned that a projector with at least 2,500 lumens kept my picture bright even with some ambient light. Contrast ratio, on the other hand, determines how deep blacks look. I once bought a projector with great resolution but poor contrast, leading to washed-out images during darker scenes. Aim for a model that offers high contrast—something above 10,000:1. To compare models, read laser projectors vs. traditional brightness. This will help you find a projector that performs well in your lighting conditions.
Set Up Your Projector Correctly
Placement is everything. For ultra-short throw projectors, position the device within a few inches of your wall. I initially placed mine too far back, resulting in a blurry image. Follow the manufacturer’s recommended distance and angle, adjusting until the picture is sharp and centered. Use a level or a smartphone app to ensure the projector is perfectly aligned. Remember, a slight tilt can distort the image, so take your time. Once aligned, connect your sources—streaming devices, Blu-ray players—and run calibration tools if available. Proper setup makes a noticeable difference, transforming your space into a cinema. For detailed steps, review ultimate guide to ultra-short throw projectors.
Optimize Your Viewing Environment
Control ambient light by closing blinds or curtains. I found that darkening the room dramatically enhanced picture quality. Use a projector screen or a smooth, matte wall for the best results—glossy surfaces reflect too much light. Consider mounting blackout curtains or adding a ceiling-mounted projector screen for a professional look. Keep reflective surfaces away from the projection path to prevent glare. Also, think about sound. A good soundbar or surround system complements your high-quality picture, creating a cinematic atmosphere. For ideas on portable options, explore portable 4K laser projectors that fit small spaces without sacrificing quality.
Many home theater enthusiasts jump into upgrading their setup with the latest 4K laser ultra-short throw (UST) projectors, lured by promises of stunning clarity and space-saving design. However, what most people overlook are the nuanced pitfalls that can turn an exciting upgrade into a frustrating experience. Let’s dig deeper into these common misconceptions and advanced mistakes so you can navigate the 2024 market smarter.
Why the hype around 4K laser UST projectors often oversimplifies reality
Everyone talks about 4K resolution and laser brightness as if they guarantee a perfect picture, but the truth is more complex. A frequent myth is that higher lumen counts automatically mean better images — but in practice, excessive brightness without proper contrast management can lead to washed-out colors and loss of detail. Experts suggest that balancing brightness with contrast ratio is key, especially in rooms with ambient light. According to a recent study by DisplayMate, contrast performance impacts perceived image quality more than resolution alone, emphasizing the importance of choosing models with high contrast ratios above 10,000:1.
Common trap: Overlooking wall surface quality and ambient light control
Many users assume that a high-end projector can compensate for subpar room conditions. But in reality, wall texture and ambient light significantly influence image clarity. Ultra-short throw projectors are highly sensitive to wall imperfections, which can cause blurry or uneven images. Additionally, ambient light, even in small amounts, diminishes contrast and color vibrancy. Investing in a quality matte wall or screen and controlling ambient lighting can make or break your viewing experience. Don’t fall into the trap of neglecting room environment; it’s a subtle factor that often gets overlooked but makes a huge difference.
What about calibration and focus—are they really that complicated?
Many assume that once the projector is set up, the picture is good to go. However, advanced users know that fine-tuning focus, keystone correction, and color calibration is essential for optimal performance. A common mistake is ignoring these steps, leading to soft images or color inaccuracies. Modern projectors often come with built-in calibration tools, but understanding how to use them effectively can elevate your setup. Proper calibration ensures sharp images across the entire screen, especially critical for detailed 4K content. Skipping this step is like buying a high-performance camera but never adjusting its settings — a missed opportunity for excellence.
Have you ever fallen into this trap? Let me know in the comments.
In conclusion, while 2024 offers incredible options for home theater upgrades, the devil is in the details. Avoid the common myths about lumen counts, overlook environmental factors, and neglect calibration for the best experience. Remember, a sophisticated setup isn’t just about the gear — it’s about understanding the nuances that make all the difference. If you’re ready to explore the top models that truly deliver, check out our ultimate 4K projector buying guide for detailed insights. And for personalized advice, don’t hesitate to reach out.
Keeping your home theater projector in top shape requires more than just initial setup. Over time, dust, lamp wear, and calibration drift can impact image quality and device longevity. That’s why investing in the right tools and following a regular maintenance routine is essential for a seamless cinematic experience. One of my favorite tools is a high-quality microfiber cloth and compressed air, which help keep lens surfaces and ventilation ports clean without scratching delicate components. Using a lens cleaning pen with a soft brush can remove stubborn smudges, ensuring crisp images during movie nights. Additionally, a digital lux meter allows me to measure ambient light levels and adjust projector settings accordingly, optimizing brightness and contrast for different environments. These simple tools make a significant difference in maintaining image quality without the need for costly professional servicing.
Beyond physical cleaning, software-based calibration tools are invaluable. Most modern projectors come with built-in calibration menus, but I prefer using third-party software like CalMAN or HCFR, which connect via HDMI or USB. These programs enable precise adjustments to color temperature, gamma, and grayscale, ensuring the projector displays accurate, vibrant colors over time. I schedule bi-annual calibration sessions, especially if I notice colors appearing washed out or if ambient lighting conditions change. Regular calibration not only preserves image fidelity but also extends the lifespan of the projector’s components, like the lamp and laser module.
Looking ahead, I predict that automation and smart diagnostics will become standard in home theater projectors. Future models may include self-cleaning lenses, automatic calibration, and predictive maintenance alerts, reducing the hassle for users. Already, some high-end devices feature built-in sensors that monitor lamp hours and suggest optimal replacement times, saving money and preventing unexpected failures. As technology advances, I recommend that users stay updated with firmware updates and incorporate these smart features into their maintenance routines.
How do I maintain my projector over time?
My best advice is to establish a regular cleaning and calibration schedule, relying on simple yet effective tools like microfiber cloths, compressed air, and calibration software. Keep the air filters clean and replace the lamp or laser module at the manufacturer-recommended intervals. Also, consider environmental factors—keeping your room cool, dust-free, and with controlled ambient light helps maintain optimal picture quality. Don’t forget to review the manufacturer’s guidelines periodically, which often include specific maintenance tips tailored to your model. If you want personalized guidance or have specific concerns, feel free to reach out for expert advice. Proper maintenance not only ensures your projector performs at its best but also maximizes its lifespan, making every movie night a true cinematic experience.
What I Wish I Learned Before Going All-In on Home Theaters
- Don’t assume higher lumen counts mean better images—balance brightness with contrast for true cinematic quality. I once bought a 3,500-lumen projector only to realize it washed out in ambient light, which was a costly mistake that taught me to prioritize contrast ratios above 10,000:1.
- Wall surface matters more than you think. A rough or glossy wall can ruin the best projector’s image. I learned to invest in a matte screen or paint the wall for a perfectly smooth surface, making a dramatic difference in clarity and color vibrancy.
- Calibration isn’t optional. Fine-tuning focus, keystone, and color settings with proper tools can elevate your picture from good to stunning. I now schedule regular calibration sessions to keep everything sharp and color-accurate, especially after room changes or ambient light shifts.
- Room environment controls are essential. Blackout curtains and controlling ambient light transformed my viewing experience. Even small adjustments to light levels can boost contrast and color depth, making your cinema truly immersive.
My Favorite Tools and Resources for a Better Home Theater
- CalMAN Calibration Software: This professional-level tool helps me dial in colors and gamma precisely, ensuring the most accurate picture over time. It’s worth the investment for serious enthusiasts.
- Microfiber Cloths and Compressed Air: Simple, affordable tools that keep my projector lens and vents dust-free, maintaining clarity and preventing overheating.
- Room Planning Apps: I use room design apps to visualize projector placement and screen size, saving me from costly mistakes and optimizing space for ultra-short throw setups.
- Expert Reviews and Buying Guides: The ultimate 4K projector buying guide is my go-to resource for understanding what features matter most and avoiding hype-driven purchases.
Seize the Moment and Elevate Your Viewing Experience
2024 is the year to embrace the potential of 4K laser and ultra-short throw projectors. With smarter technology, better affordability, and a focus on environmental setup, you can create a home theater that rivals the cinema. Don’t let fear or misconceptions hold you back—start small, learn the nuances, and enjoy every moment of your cinematic journey. Your perfect home theater is within reach, and I believe you can do it. Ready to take the first step? Share your thoughts and questions below, or reach out for personalized advice. Happy projecting!
http://Emily%20Carter
I completely relate to the frustration of trying to find the right home projector—I’ve been there! I also started with a budget model that looked fine initially but fell short in darker scenes due to poor contrast. Since upgrading to a good-quality 4K laser UST projector, the difference is night and day. The brightness and sharpness really bring movies to life in my small apartment. I think one of the key factors often overlooked is room setup, especially wall surface quality. I painted mine matte to eliminate glare and uneven reflections. My question for others is, how do you handle ambient light sources in small spaces? Do blackout curtains make enough difference or are there other tricks you’ve found effective? I’d love to hear your experiences, especially those who’ve managed to create a cinema-like feel without dedicated rooms.
http://Michael%20Johnson
I completely agree with Emily’s point about room setup and wall surface quality. I’ve also found that investing in a good matte screen or even painting the wall with special projector paint can make a huge difference, especially in small spaces. When it comes to ambient light, blackout curtains have been a game-changer for me — they really help deepen the blacks and improve contrast. However, some ambient light control in a small room can be tricky without making the space feel cramped. I’ve also tried adding some soft, indirect lighting that doesn’t spill onto the screen but provides enough illumination for safety and comfort. Does anyone have suggestions for effective yet unobtrusive lighting choices that work well with ultra-short throw projectors? Would love to hear more ideas on maintaining that cinematic feel without sacrificing comfort or space.