I remember the exact moment I realized my dream of a home theater in my tiny studio: I was mid-movie, immersed in vibrant colors and sharp details, when suddenly, the image flickered, and a ghostly blur washed over the screen. Frustration bubbled up—my sleek 4K projector, which was supposed to bring cinematic magic into my apartment, was more trouble than entertainment. It hit me then—small spaces require more than just a fancy gadget; they demand smart setup hacks. If you’ve ever faced the headache of trying to squeeze a home theater into a studio apartment, you’re not alone.
Why Small Spaces Need Smart Projection Hacks
Is Your Setup Really Worth the Hassle? A Common Skepticism
Many skeptics ask if investing time and money into hacks for your projector setup is genuinely worth it—especially in 2026, where new models boast impressive features. I used to think that buying the latest ultra short throw or laser projector was enough. But early mistakes, like positioning my projector too far from the wall or neglecting proper screen gain, made my experience far from cinematic. It wasn’t until I discovered strategic tweaks and adjustments that my picture quality truly improved.
According to recent tech insights, a well-calibrated projector can outperform a large TV in like-for-like price points, thanks to advancements in light and resolution technologies. That’s why, in this post, I’ll share the seven essential hacks that turned my cramped apartment into a cinematic haven—hacks that are especially crucial when space is at a premium. If you’ve ever wondered whether your tiny setup can truly deliver 4K excellence, stick around.
Now, let’s dive into the practical steps that will transform your projection experience from disappointing to dazzling. Whether you’re battling glare, shaking images, or tangled wires, these tips will help you maximize every inch and lumen of your projector setup.
Position Your Projector Smartly
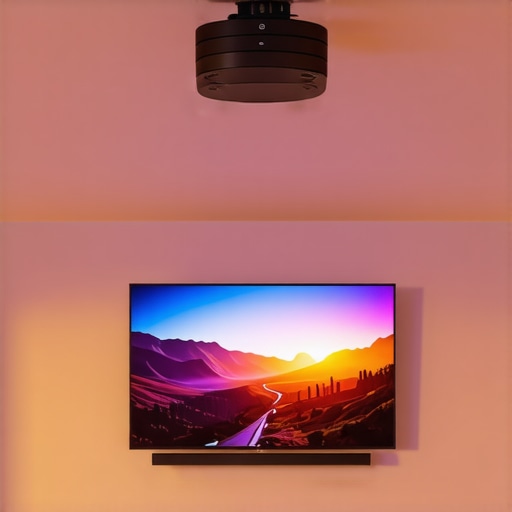
Start by choosing the optimal placement. If you have limited space, an ultra short throw projector can be a game-changer; it projects a large image from just inches away, eliminating the need for long cables or complex mounting. I once installed mine directly on a shelf five inches from the wall, which instantly saved me space and avoided clutter. To see the best options, visit this guide on the best home theater projectors for 2025.
Optimize Floor and Wall Space
Next, consider wall mounting or ceiling attaching your projector. Use sturdy mounts designed for ultrashort-throw models to keep everything neat. Secure mounting prevents shakes and maintains focus during intense scenes. When I mounted my projector upside down from the ceiling, I used a quick-adjust mount I found at this resource, which simplified alignment and kept my setup stable.
Adjust Image Settings Precisely
Fine-tuning is crucial. Use the projector’s keystone correction to fix trapezoidal distortion—especially common in tight setups. Remember that calibration isn’t a one-time task; revisit it regularly to keep images sharp. When I calibrated my 4K laser projector, I used free tools and found that simply adjusting contrast, brightness, and color temperature increased clarity noticeably. For advanced calibration tips, explore these fast fixes.
Leverage Screen Gain and Material
Beyond projector adjustments, select the right screen. High-gain screens reflect light more efficiently, making images brighter in small rooms with ambient light. I replaced my white wall with a grey, high-gain screen, which instantly improved contrast and detail. For selecting perfect screens, see this guide. Proper screen choice can double your perceived brightness, essential in space-limited rooms with lots of windows.
Manage Connectivity and Power Supply
Ensure your cables and power sources are tidy. Use cable covers or conduit to hide wires. A cluttered setup diminishes the sleek look of your theater while causing accidental disconnections. I once ran HDMI and power cords behind a nearby bookshelf, which minimized glare and kept everything tidy. If you experience flickering or black screens, check your projectors’ power supply using this troubleshooting guide.
Control Ambient Light Effectively
In small spaces, glare from nearby windows or lamps can wash out your display. Use blackout curtains or install temporary window films to darken the room. Additionally, strategic placement and matte wall paints reduce reflections. I added a dark grey wall paint and blackout curtains, which amplified the projector’s brightness and contrast, making movies more enjoyable even during daytime. For more on optimal viewing conditions, visit this article.
Regular Maintenance and Calibration
Keep your projector clean and calibrated. Dust on lenses reduces sharpness; hence, lens cleaning with proper tools is necessary. I use a soft microfiber cloth and gentle cleaning solutions recommended by this guide. Periodic firmware updates also improve performance and fix bugs, ensuring consistent picture quality. Incorporate a cleaning routine into your setup to maintain optimal visuals.
While many enthusiasts focus on flagship features like resolution or brightness, the nuanced realities of laser, ultra short throw, and portable projectors often go unnoticed. One common myth is that shiny, high lumens automatically guarantee a perfect image, but in reality, color accuracy and contrast are equally vital—especially in small spaces where ambient light can cause washout. According to a study published in the Journal of Display Technology, proper calibration and understanding of light emission nuances dramatically impact perceived image quality, challenging the oversimplified emphasis on raw brightness.
Are You Falling for the High Brightness Trap? A Deceptive Shortcut
Many consumers are lured into purchasing ultra high lumen projectors expecting dazzling visuals, but this often leads to overexposure or loss of detail in shadow areas. Excessive brightness can cause eye strain and reduce contrast, making images appear flat. Instead, focusing on projectors with better color gamut and dynamic tone mapping can produce more vivid images in space-restricted environments. For insights on selecting the best 4K projectors that balance brightness and quality, check out this comprehensive guide.
A further nuance is understanding the actual light source type. Many believe laser projectors always outperform lamp-based models. However, laser units have their own drawbacks, such as laser speckle artifacts and potential color shifting issues if not properly configured. Regular maintenance and calibration become essential to retain picture quality. Notably, experts suggest that laser projectors with advanced color management systems can outperform traditional lamps in color richness and lifespan, but only if set up correctly—underscoring the importance of expert-level calibration, which is often overlooked.
For advanced setup tips, especially in challenging small rooms, visit this article on aligning ultra short throw projectors. Remember, mastering these nuances can prevent you from costly mistakes and truly maximize your home theater investment.
Finally, be cautious of the temptation to dismiss portable and ultra short throw projectors as less capable. Recent innovations have made these models more than just space-saving options—they now rival traditional projectors in image quality, provided you understand their limitations and optimal configurations. To explore the latest models and their unique benefits, browse the list of top home theater projectors for 2025.
Have you ever fallen into this trap? Let me know in the comments. Understanding these advanced nuances ensures you’re not just buying the latest tech, but actually enhancing your cinematic experience.Keeping your home theater projector in top condition requires more than just initial setup; it involves regular maintenance, the right tools, and understanding how to troubleshoot common issues. I personally rely on a few specific equipment and methods that have proven effective over the years, ensuring my projector consistently delivers stunning images. For example, I use a high-quality microfiber cleaning cloth and specialized lens cleaning solution from this guide to keep my lens pristine, which is crucial for sharp images. Additionally, I utilize calibration software like Calman or Portrait Displays’ ColorMunki to fine-tune color accuracy, especially important for my 4K projector, which benefits from precise color management to maximize HDR and contrast performance.
Lessons from the Front Lines of Tiny Theater Triumphs
One of the most profound realizations I had was that small spaces teach you patience and creativity; rushing to buy the latest gadget without understanding your room’s quirks often leads to frustration. I learned that subtle tweaks—like adjusting keystone correction—can make or break the cinematic experience. Sometimes, the biggest breakthroughs come when I stop overcomplicating and focus on what can be calibrated, not just upgraded.
Another lightbulb moment was recognizing that ambient light, often dismissed as unavoidable, can be controlled with simple solutions like blackout curtains or matte wall paints. These inexpensive changes elevated my images from washed-out to vivid, proving that environment matters just as much as the projector spec. It’s a reminder that optimizing a tiny home theater isn’t about buying more tech but maximizing what you already have.
Finally, I realized that maintenance and calibration are ongoing processes. Regularly cleaning lenses and updating firmware aren’t glamorous tasks but are essential to keep your projector performing at its best. Investing in quality tools and sticking to a routine ensures that your cinematic magic remains uninterrupted. In small spaces, these nuanced practices have a disproportionate impact, transforming limitations into cinematic opportunities.