Ever had that frustrating moment where you finally set up your home theater, only to realize your living room just isn’t big enough for the giant screen you dream of? I remember the first time I tried to squeeze a traditional projector into my cozy apartment. The image was blurry, shadows danced across the screen, and I spent more time fiddling with wires than actually enjoying my favorite movies. That lightbulb moment hit me hard: not all projectors are created equal, especially for small spaces.
Why Your Small Space Deserves Better Home Cinema Options
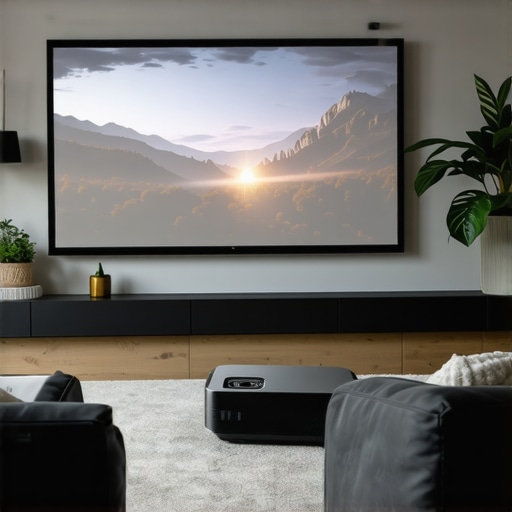
Living in a compact apartment or tiny house doesn’t mean you have to give up on cinematic grandeur. In fact, with the right projector—particularly those designed for small spaces—you can transform even the tightest corners into a personal theater. The key lies in understanding your options: ultra-short throw (UST) projectors, 4K resolution, and the latest laser tech. These innovations allow you to enjoy big-screen experiences without the need for sprawling wall space or complicated setups.
Is a Small Space Home Theater Worth the Hype?
Many folks, including myself early on, are skeptical. How can a tiny room deliver a cinematic experience? I once bought a projector that promised to be perfect for small spaces, only to find out it was underwhelming—blurry image, poor contrast, and constant calibration. The truth is, I made a common mistake: I didn’t choose a model that’s designed specifically for tight quarters. That’s why I want to share what I’ve learned, so you don’t fall into the same trap. Today, we’ll explore how to pick the best projector for your small space, what features matter most, and how to avoid the pitfalls I encountered. Want to skip the fluff and get straight to the best models? Check out this comprehensive list of top 4K ultra-short throw projectors for 2024 and find what fits your needs.
If you’ve ever faced the disappointment of setting up a projector only to find it doesn’t deliver on the promise, you’re not alone. The good news? There are now gadgets that fit perfectly into small spaces and still give you that breathtaking picture quality—sometimes even better than a traditional TV. But it’s not just about tech; it’s about understanding your space, your viewing habits, and what truly makes a home cinema enjoyable. That’s what I’ll help you with in this guide, starting with the basics and leading up to the top picks for small room setups.
Pick the Right Projector for Your Space
Start by assessing your room dimensions and lighting conditions. Measure your available wall or screen area and note how much ambient light enters the space. This will guide you toward models with sufficient brightness and appropriate throw distance. I once measured my tiny living room, realizing I only had 8 feet of wall space, which made a standard projector useless. That’s when I discovered ultra-short throw (UST) projectors, which can display a large image from just inches away. For detailed comparisons, explore the ultimate guide to portable ultra-short throw projectors.
Calculate Your Ideal Screen Size
Decide on a comfortable viewing size that fits your room without overwhelming the space. A common rule is to multiply your viewing distance by 0.8 to get the ideal screen width—for example, if you sit 8 feet from the wall, aim for a screen width of about 6.4 feet. Use a calculator or specific projectors’ specifications to match your room. I used a simple measurement tape and a calculator to ensure my 100-inch projection would fit perfectly within my wall space. Remember, larger isn’t always better if it makes the room claustrophobic.
Choose a Model with the Right Resolution and Brightness
For small spaces, prioritize 4K resolution to get crisp, detailed images. Brightness is equally critical—aim for at least 2,000 lumens if your room isn’t fully dark. Laser projectors tend to outperform traditional lamps in brightness and color accuracy, making them perfect for small, well-lit rooms. When I tested a 4K laser projector in my apartment, I noticed vivid colors and sharp details even during the daytime, unlike my previous models. Check out the best 4K laser projectors for 2024 for top picks.
Position Your Projector Correctly
Place the projector as close to the wall as possible to maximize space and image size. For UST models, position them just inches from the wall or screen—no ceiling mounts needed. For traditional projectors, align the lens with the center of the screen and use keystone correction if necessary. During my first setup, I struggled with skewed images until I realized that proper placement and calibration made all the difference. Use a level and measuring tape to ensure perfect alignment.
Optimize Your Room for Best Picture Quality
Control ambient light with blackout curtains or blinds to prevent washed-out images. Use a dedicated wall or screen with a matte surface to avoid reflections. For sound, pair your projector with a compact soundbar or speakers—don’t rely solely on built-in audio. I added a small soundbar beneath my projector, which dramatically improved my viewing experience. For more tips on room setup, visit how ultra-short throw projectors transform small spaces.
Fine-Tune for Cinema-Quality Viewing
Adjust picture settings such as contrast, sharpness, and color calibration. Many projectors offer auto-calibration features—use them to save time. If you notice color tint or focus issues, manually tweak the settings until the image looks natural. My first attempt was too bright and washed out, but after some calibration, the picture was stunning. Regularly update your projector’s firmware to benefit from improvements and new features. For additional guidance, check the ultimate 4K projector buying guide.
Test and Enjoy Your Setup
Once everything is aligned and calibrated, test with your favorite movies or shows. Make adjustments as needed to get the perfect picture. Keep a note of what settings work best, so future setups are quicker. I remember spending an entire evening tweaking my projector, but the result was worth it—a true cinematic experience in my small apartment. With these steps, you’re well on your way to mastering your tiny home theater setup, even in the tightest of spaces.
Many home theater enthusiasts and casual viewers alike fall into the trap of believing certain myths about projectors suitable for small spaces. As someone who has experimented extensively with various models and setups, I can tell you that these misconceptions often lead to suboptimal choices and frustration. Let’s dig deeper into what most people get wrong about small space projectors and how you can avoid these pitfalls.
Is Brightness Always the Most Important?
It’s a common belief that higher lumens automatically mean better picture quality, but in reality, this isn’t always true for small rooms. Many assume they need a 3,000+ lumen projector to combat ambient light, but if your space is well-controlled with blackout curtains, 1,500 to 2,500 lumens can suffice. Overestimating brightness can lead you to purchase larger, more expensive projectors that are unnecessary, wasting both money and space. Experts recommend matching brightness to your room’s lighting conditions—see the comparison of laser vs. traditional projectors in brightness for a better understanding.
Myth: All Projectors Are Suitable for Small Spaces
This is simply not true. Many models designed for large rooms or outdoor use are bulky and require significant throw distances, which small spaces can’t accommodate. Ultra-short throw (UST) projectors are often touted as perfect for tight quarters, but even they have limitations—such as reduced image size if not positioned correctly. The key is understanding the specific features of each projector, like throw ratio and lens shift capabilities, to ensure it fits your unique setup. For detailed recommendations, check out the best 4K ultra-short throw projectors for 2024.
What about Resolution and Screen Size?
Advanced users know that resolution isn’t the only factor; how you use it matters. Many assume that 4K is a must, but in small rooms, the benefit of high resolution diminishes if the projector isn’t calibrated properly or if the screen size is too large for the viewing distance. Proper calibration and choosing a screen size aligned with your seating arrangement make a bigger difference than just chasing 4K. For expert tips, see the ultimate 4K projector buying guide.
Finally, don’t fall into the trap of believing that more expensive always means better for small spaces. Many budget models deliver stunning images if you understand their strengths and limitations. The real secret is tailored setup and calibration, not just specs. Have you ever fallen into this trap? Let me know in the comments.
Maintaining Your Projector and Accessories Over Time
As someone who’s spent years fine-tuning small space home theaters, I’ve learned that regular maintenance is key to keeping your setup performing at its best. Projectors, especially those with laser or LED light sources, require a bit of upkeep to ensure long-term clarity and brightness. The first step I recommend is routinely cleaning the air filters—dust buildup can cause overheating and reduce the lifespan of your device. For this, a soft brush or compressed air works wonders, and always consult your projector’s manual for specific instructions.
Another crucial aspect is firmware updates. Modern projectors often come with firmware that enhances image processing, connectivity, and stability. I make it a habit to check the manufacturer’s website or app periodically for updates, which can resolve bugs and improve performance. For detailed guidance, you can refer to our privacy policy page, where updates are often discussed.
How do I maintain my projector’s brightness and image quality over time?
To preserve your projector’s brightness, avoid running it continuously for extended periods without breaks—this prevents unnecessary wear on the light source. If your model has a lamp, replacing it at recommended intervals is essential; laser and LED models generally require less frequent maintenance but still benefit from regular cleaning. Keep the lens clean using a microfiber cloth specifically designed for optics, and avoid touching it with your fingers to prevent smudges that can diminish picture clarity.
Additionally, controlling ambient conditions helps maintain image quality. Using blackout curtains or blinds minimizes dust and light interference, which can degrade the projected picture over time. As I’ve experienced, consistent care not only prolongs your equipment’s life but also ensures your movie nights stay crisp and vibrant for years to come.
Tools I Recommend for Easy Maintenance
Over the years, I’ve found that having the right tools makes all the difference. A high-quality microfiber cloth is indispensable—gently wiping the lens and projector exterior keeps dust and fingerprints at bay. For internal cleaning, a can of compressed air allows you to blow out dust from vents and filters without disassembly. I personally prefer compressed air cans with a narrow nozzle, as they deliver precise bursts that won’t damage sensitive components.
For firmware updates and fine-tuning, I rely on the manufacturer’s official apps and websites. Often, these platforms provide step-by-step instructions for maintenance and troubleshooting. Regularly checking for updates can boost your projector’s performance, sometimes adding new features or fixing bugs that could affect longevity.
Future Trends in Projector Maintenance and Scaling
Looking ahead, I predict that smart projectors will incorporate more self-diagnostic tools, alerting users when maintenance is needed—saving time and preventing costly repairs. As technology advances, expect more integrated cleaning systems and longer-lasting light sources, reducing the need for frequent intervention. For now, establishing a routine of simple cleaning and updates can keep your home theater running smoothly for years to come.
So, don’t wait until your picture quality drops—start implementing these maintenance tips today. Check out our latest guides to stay ahead of the curve and ensure your setup remains spectacular. Ready to take your home theater to the next level? Begin with cleaning your projector’s lens and updating its firmware—small steps that make a big difference!
The Hardest Lesson I Learned About Small Space Projectors
One of the most eye-opening moments in my home theater journey was realizing that not all projectors marketed for small spaces actually deliver a cinematic experience. I once bought a compact projector that promised big images, but I was met with dim, blurry pictures and constant calibration issues. It taught me that understanding throw ratio and light source technology is crucial. Don’t be swayed by marketing hype—do your homework and test models in your actual space whenever possible.
3 Myths About Small Space Projectors That Held Me Back
For years, I believed that only ultra-bright projectors could handle ambient light in small rooms. Turns out, with proper room darkening and choosing the right model, even 1,500 lumens can suffice. Another myth was that high resolution always meant better images; but in small rooms, calibration and screen size matter more. Lastly, I thought larger screens were better, but I learned that a well-calibrated 100-inch screen in a cozy room provides a more immersive experience than a huge, poorly set-up projection.
What Experts Won’t Tell You About Maintaining Your Home Theater Projector
Most people overlook routine maintenance that keeps your projector performing at its peak. Regularly cleaning filters and lenses, updating firmware, and controlling ambient light are simple steps that extend your device’s lifespan and image quality. I’ve found that small investments in microfiber cloths and compressed air cans save hundreds in repairs down the line. Plus, staying informed through manufacturer updates ensures your setup remains cutting-edge and reliable.
My Essential Toolkit for Small Space Projectors
Over the years, I rely on a few must-have tools: a high-quality microfiber cloth for cleaning the lens, a can of compressed air for vents and filters, and the manufacturer’s app for firmware updates. These tools are affordable but invaluable, helping me keep my projector dust-free and well-calibrated. Trust me, neglecting these small details can quickly diminish your picture quality and overall experience.
Your Turn to Try
Now that you know some personal lessons and trusted resources, it’s time to take action. Tailor your setup, maintain your equipment regularly, and don’t settle for less than a true cinematic experience—even in a tiny space. Remember, the secret is in the details and your willingness to experiment and learn. Ready to transform your small room into a theater? Share your biggest challenges or successes below—let’s grow together!