Have you ever tried setting up a home theater only to realize your living room is too cramped for a traditional projector? I remember my first attempt—wrestling with a bulky projector, trying to hide the cables, and ending up with a blurry image that made me want to give up. That lightbulb moment hit me hard: there has to be a better way for small spaces. And there is. Today, I want to share how ultra short throw and laser 4K projectors transformed my tiny apartment into a cinematic haven without sacrificing space or style.
Why Most Home Projectors Fail in Small Spaces
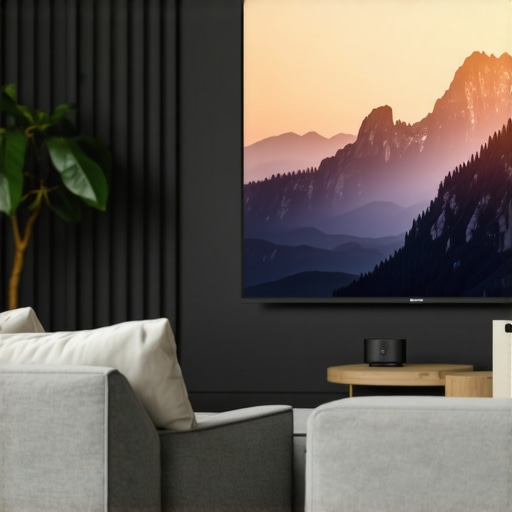
Here’s the truth: traditional projectors aren’t designed for cramped quarters. They need distance, and that often means sacrificing wall space or dealing with awkward shadows. I made the mistake early on of choosing a projector based on specs alone, only to realize it wouldn’t fit my room — or worse, it would require a complicated ceiling mount. That’s when I discovered the magic of ultra short throw (UST) projectors. These devices can sit just inches from the wall and still produce a giant, crisp image. No more cluttered cables or awkward setups. And with the advent of laser technology, these projectors now offer stunning 4K clarity that rivals even commercial cinemas.
What I love most is how these projectors unlock small space home theaters, making them more accessible and less invasive. If you’ve been holding back because of space constraints, I promise you’re not alone. Many of us have faced the same frustration. But the good news is, with the right equipment, you don’t need a dedicated room to enjoy cinematic nights. Instead, you can create a compact, high-quality viewing experience right in your living room or even a bedroom corner.
Is This Technology Really Worth the Hype?
At first, I was skeptical. I mean, how good could a tiny projector be? I’d read about laser projectors and ultra short throw models, but I hesitated, worried about cost or complexity. My early mistake was thinking bigger was better — I overlooked the potential of these smaller, smarter devices. Once I tried an ultra short throw laser 4K projector, everything changed. The picture was vibrant, the setup was simple, and it fit perfectly in my small space. If you’re wondering whether these projectors are just marketing hype, I get it. I’ve been there. The truth is, they offer real benefits, especially for small rooms.
If you’re tired of the cluttered, underwhelming home theater experience, it might be time to consider a dedicated upgrade. And if you want to explore the best options, I highly recommend checking out our ultimate guide to ultra short throw 4K projectors for small spaces. It’s packed with honest reviews and practical tips to help you choose what’s right for your space.
So, tell me—have you ever faced the challenge of fitting a home theater into a tiny room? If so, don’t worry. You’re about to discover a solution that can turn that frustration into pure entertainment bliss. Ready to transform your small space into a cinematic paradise? Let’s dive into the practical steps that will make it happen.
Select the Right Projector for Your Space
Start by choosing an ultra short throw (UST) laser 4K projector that fits your room dimensions. Unlike traditional models, UST projectors can sit just inches away from the wall, creating a large, sharp image without cluttering your space. When I first attempted my setup, I realized a standard projector was too bulky and required a distant placement, which cluttered my small living room. Opting for a compact, laser 4K UST projector made all the difference, transforming my space into a cozy cinema. For in-depth reviews and options, check out our ultimate guide to laser ultra short throw 4K projectors.
Perfect Placement and Screen Setup
Position your projector just a few inches from the wall or screen surface. Use a tape measure to ensure precise placement—about 12-24 inches from the wall typically works for most models. I used painter’s tape to mark the spot during my initial test, which was messy but essential. Remember, the goal is to minimize shadows and avoid cable clutter. If your wall isn’t suitable, consider a portable projector with a flat, blank surface or a dedicated projection screen designed for small spaces. For portable options, explore our portable projector guide.
Calibrate for Clarity and Color
Once positioned, calibrate your projector for optimal picture quality. Use the projector’s menu to adjust keystone correction, focus, and color settings. I spent a few hours tweaking my projector, and the difference was night and day—bright, vibrant images with sharp edges. If you’re unsure about calibration, many models come with automatic setup features, or you can consult a professional through our contact page. Proper calibration ensures your small space doesn’t compromise on cinematic quality.
Optimize Audio and Viewing Comfort
Small rooms can amplify sound, so consider adding a compact soundbar or bookshelf speakers for immersive audio. I connected my soundbar directly to my projector via Bluetooth, which was straightforward and clutter-free. Seating arrangement is also crucial—place your couch or chair at an optimal distance for 4K clarity, usually about 8-10 feet away. Experiment with positioning to avoid neck strain or glare. For tips on enhancing your audio-visual experience, visit our best 4K home theater projectors guide.
Keep Cables and Accessories Organized
Use cable management solutions such as clips, sleeves, or adhesive cable organizers to keep cords out of sight and prevent tripping hazards. I routed my HDMI and power cables along the wall corners, securing them with adhesive clips. This simple step kept my setup clean and focused on the viewing experience. If you want a truly portable setup, consider a compact, battery-powered portable projector, which can be moved easily and requires minimal wiring. For portable projector recommendations, check out our portable ultra short throw 4K projectors guide.
Test and Enjoy Your New Home Theater
Finally, test your setup during different times of day and lighting conditions to ensure consistent quality. Adjust your blinds or curtains to control ambient light, especially if your room has large windows. I learned this the hard way—bright sunlight washed out my images until I added blackout curtains. Once everything was set, I enjoyed crisp 4K movies right in my small apartment, with a setup that looked and felt professional. Remember, small spaces require precise placement and calibration, but with the right equipment, you can achieve a cinematic experience that rivals commercial theaters.
Many enthusiasts jump into buying a home theater projector, especially when considering options like 4K projectors or ultra short throw models. But let’s dig deeper into the nuances most people overlook, which can turn a good setup into a frustrating experience. One of the biggest myths I’ve encountered is the belief that bigger is always better. While a large image is appealing, choosing a projector with too much lumens or too high resolution without considering room lighting and space can actually backfire. For small rooms, a projector with excessive brightness or resolution often results in overexposure or a washed-out picture, especially if ambient light isn’t controlled. Instead, focus on a balanced brightness, such as 2000-3000 lumens, for most small spaces, and consider the room’s lighting conditions before selecting a 4K or laser projector.
Another common mistake is underestimating the importance of proper placement and calibration. Many forget that even the most advanced projector won’t shine if not correctly aligned or calibrated. Keystone correction and focus adjustments are crucial; neglecting these can lead to distorted images or uneven focus across the screen. Advanced users should invest time in calibration to get the most out of their equipment—automatic calibration features are helpful but manual fine-tuning often yields better results. For those interested in a comprehensive setup, I recommend exploring our ultimate guide to 4K projectors.
Are High Lumens Always Better for Small Rooms?
This is a question I often get, and the answer might surprise you. According to industry experts, including calibration specialists, higher lumen ratings are not necessarily advantageous in small, controlled environments. Excessive brightness causes glare and reduces contrast, especially in rooms with reflective surfaces. The goal is to find a sweet spot that provides vivid images without washing out details. For small rooms, projectors with 2000-3000 lumens typically strike the right balance. Overly bright projectors can also cast unwanted shadows or cause eye strain during extended viewing sessions. To learn more about this, check out our comparison of laser vs traditional projectors.
Many newcomers are also seduced by the allure of portable projectors, assuming they’re just as capable as dedicated models. While portability is a plus, it often comes with compromises—such as lower brightness, shorter bulb life, or limited features. If you’re considering a portable projector for small spaces, be aware of these trade-offs and choose models specifically designed for high-quality images in confined areas. Our portable ultra short throw guide provides insights into selecting the best portable units that won’t disappoint.
Finally, many users overlook the importance of screen quality. Projectors, especially laser and 4K models, perform best when paired with high-gain screens or properly calibrated surfaces. Using a matte wall with uneven textures or dark colors can diminish image clarity. Professional calibration and choosing the right screen material can significantly enhance contrast and color accuracy, giving your small-space setup a cinematic punch. Remember, the devil is in the details, and a little extra investment in calibration and accessories can elevate your home theater experience. Have you ever fallen into this trap? Let me know in the comments.
Maintaining your home theater setup, especially high-tech devices like 4K laser projectors and ultra short throw models, is crucial for long-term performance and picture quality. Over time, dust, fingerprints, and even minor misalignments can degrade image clarity and color accuracy. That’s why having the right tools and a solid maintenance routine can make all the difference in preserving your cinematic experience.
Essential Tools for Longevity and Performance
First, invest in a microfiber cleaning cloth and a gentle lens cleaner designed specifically for projector optics. I personally use a high-quality microfiber cloth combined with a lens cleaning solution from reputable brands like Zeiss or Nikon, which effectively remove dust and smudges without scratching delicate surfaces. Regular cleaning ensures your image stays sharp and vibrant, especially in rooms with pet hair or dust accumulation.
Next, a compressed air can or electric air blower is invaluable for removing dust from vents and internal components. I’ve found that blowing out filters and vents every few months prevents overheating and maintains optimal brightness levels. For precise adjustments, a digital level or laser distance meter can help ensure your projector remains perfectly aligned, which is essential for ultra short throw models that sit close to the wall or screen surface.
How do I maintain my projector over time?
Routine calibration is key. Use the projector’s built-in settings or dedicated calibration software to fine-tune color balance, contrast, and keystone correction periodically. For my laser 4K projector, I run automatic calibration every six months using the manufacturer’s calibration tools, which are often available via the device menu or companion app. Keeping firmware updated is equally important—manufacturers frequently release updates that improve image processing, add features, and fix bugs. I make it a habit to check for firmware updates monthly through the official support site.
Additionally, consider the environment where your projector operates. Avoid placing it in humid or dusty rooms. Using a dedicated projection screen with a matte surface minimizes reflections and dirt buildup, which can otherwise necessitate more frequent cleaning. If you’re in a small space, maintaining good ventilation prevents overheating and prolongs device lifespan.
Future Trends in Projector Maintenance
Looking ahead, the integration of AI-based calibration tools and IoT connectivity will simplify maintenance even further. Imagine an ultra short throw laser projector that automatically detects dust buildup and adjusts settings to compensate for minor misalignments—saving time and ensuring consistent quality. Companies are also developing self-cleaning filters and more durable laser light sources that require less maintenance over their lifespan.
To get the most out of your investment, I highly recommend trying advanced calibration tips, such as using professional-grade colorimeters or software like CalMAN or DisplayCAL, which are tailored for high-end projectors. These tools guide you step-by-step to achieve perfect color accuracy and contrast, elevating your viewing experience to cinema quality.
Remember, consistent upkeep not only preserves your projector’s performance but also extends its lifespan. For personalized support, don’t hesitate to reach out via our contact page. Keep your projector in peak condition, and enjoy breathtaking visuals for years to come!
The Hidden Lessons I Discovered About Small Space Home Theater Setup
- One of my biggest lightbulb moments was realizing that traditional projectors are often oversized and impractical for tiny rooms. Switching to ultra short throw laser 4K projectors transformed my cramped apartment into a true cinematic space with minimal clutter and maximum impact.
- I learned that calibration and placement are more critical than fancy features. Spending time to fine-tune keystone, focus, and color settings paid off in a vibrant, clear picture that rivals commercial cinemas, even in small rooms.
- Another lesson was not to chase higher lumens blindly. In small, controlled environments, 2000-3000 lumens are enough and prevent washed-out images or glare, especially when ambient light is managed effectively.
- Investing in quality accessories like a high-gain screen or proper calibration tools can elevate your viewing experience dramatically, making even modest projectors look spectacular.
- Regular maintenance—cleaning lenses, updating firmware, and checking alignment—ensures your setup remains in peak condition over time, avoiding frustrating image degradation.
Tools and Resources I Swear By for Home Theater Success
- CalMAN or DisplayCAL: For professional calibration, these software tools help fine-tune color accuracy and contrast, transforming your small space into a true home cinema.
- High-quality microfiber cloths and lens cleaner: Regular cleaning keeps your projector’s optics sharp and vibrant.
- Digital level or laser distance meter: Precise placement is crucial for ultra short throw models, and these tools simplify the process.
- Our Ultimate Guide to Ultra Short Throw 4K Projectors: A comprehensive resource to help you choose the right model for your space, with honest reviews and practical tips.
Your Next Step Toward Cinematic Bliss
Transforming a small space into a cinematic haven is more achievable than ever with the right technology and knowledge. Don’t let limited room size hold you back—embrace the power of ultra short throw laser 4K projectors and create a personal theater you’ll love. Remember, the key is patience, calibration, and a bit of experimentation. Ready to bring your small space to life with stunning visuals? Start today and enjoy the magic of home cinema!
What’s been your biggest challenge in setting up a home theater in a small space? Let me know below!
http://Emily%20Carter
This post really resonated with me! I’ve always struggled with finding effective ways to set up a home theater in my small studio apartment. The idea of ultra short throw (UST) projectors being so close to the wall yet delivering a crisp, cinematic picture is a game-changer. When I first considered upgrading, I was overwhelmed by the options and worried about the cost. Reading through the benefits and setup tips here, I feel more confident about choosing a compact laser 4K projector now. What’s been your biggest challenge during installation — is it calibration, placement, or something else? I’d love to hear how others managed to optimize their tiny spaces without sacrificing picture quality. Also, does anyone have tips for managing ambient light, especially with large windows that let in a lot of daylight? Thanks for sharing such detailed insights—this definitely motivates me to finally give my small space the upgrade it deserves!
http://James%20Anthony
This article really hits close to home for me. I’ve faced similar frustrations trying to fit a home theater into my compact Manhattan apartment. The shift to ultra short throw laser 4K projectors was a game-changer—sitting just inches from the wall and still projecting a vibrant, large image saved me from installing a bulky traditional projector. One challenge I initially encountered was calibrating the image correctly, especially getting the keystone and focus right in a room with uneven walls. I’ve found that investing in a good calibration tool and taking the time to tweak the settings makes a huge difference in picture quality.
Regarding ambient light, I hung blackout curtains which significantly improved contrast and color vibrancy, especially during daytime viewing. Do others here prefer manual calibration for precision or rely on automatic settings? Also, what’s your go-to solution for minimizing cable clutter in small spaces? Finding practical, space-saving accessories has really helped me complete my setup without overwhelming the room. Looking forward to hearing everyone’s tips and tricks for maximizing small space home theaters!